

Comment from: miracle

This article will teach you what you need to know to be able to develop your own b2evolution skins as quickly as possible.
Note: if you only are looking for a quick & dirty hack to change your CSS, try this: How to add custom CSS. The current page you’re looking at is much more interesting though ;)
If you hare coming here as a professional skin/theme designer and you have never actually used b2evolution before, we recommend you browse through our guided tours in order to get a general overview of what b2evolution does and how it’s laid out. Especially look at:
You should probably always use the very latest cutting edge beta or even alpha version of b2evolution – get it from the GitHub reprository here – when developing skins, because extended features are added all the time (especially regarding Containers and ).
The screenshots below are for b2evolution version 6.2.1-alpha. This article is currently being updated for b2evolution version 6.4.0-alpha.
Below, we will guide you through the following phases:
A skin (or a "theme" as others call it) is a certain "look & feel" applied to a b2evolution Collection.
In the default b2evolution installation with demo contents, each collection uses a different skin.
In the following paragraphs we will examine the collection named "Blog A" which is installed by default in b2evolution and which happens to use the skin named "Bootstrap Blog".
As a skin developer you should do one of the following:
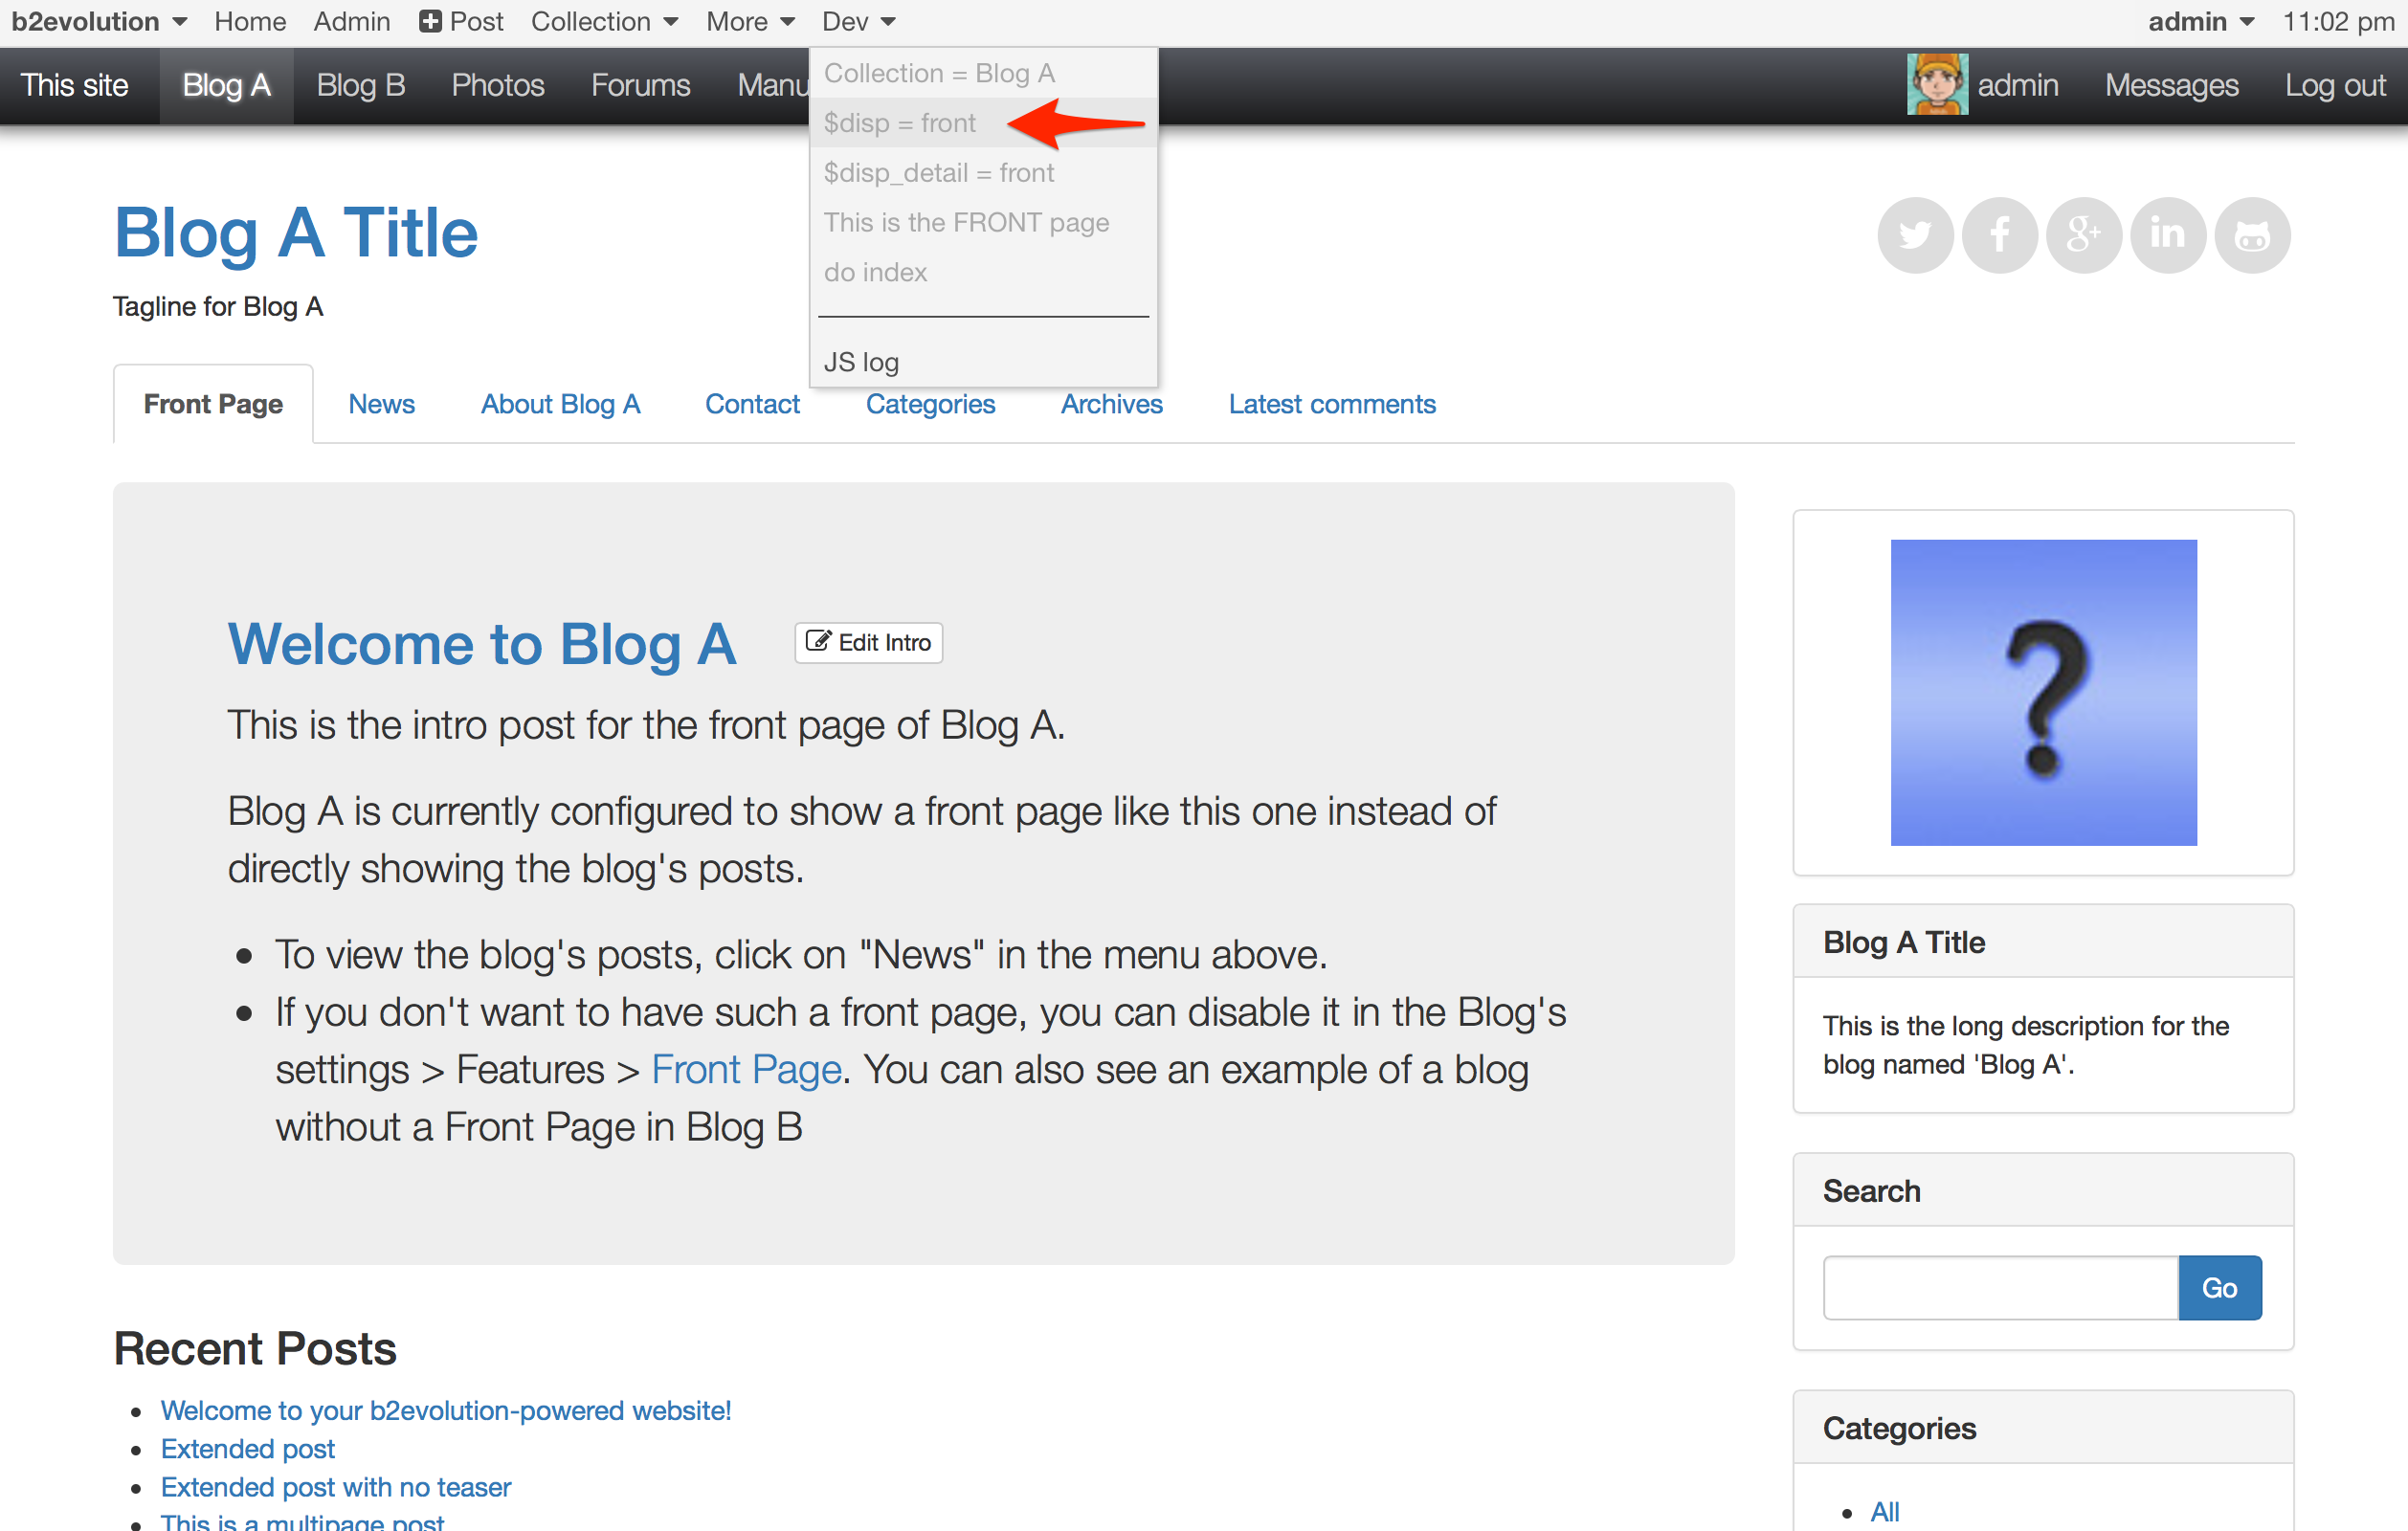
$debug = 1 in the right config file).$dev_menu = 1 in a similar way (This second way is cleaner)Once you have done one of the above, a "Dev" menu will appear in the Evo Bar.
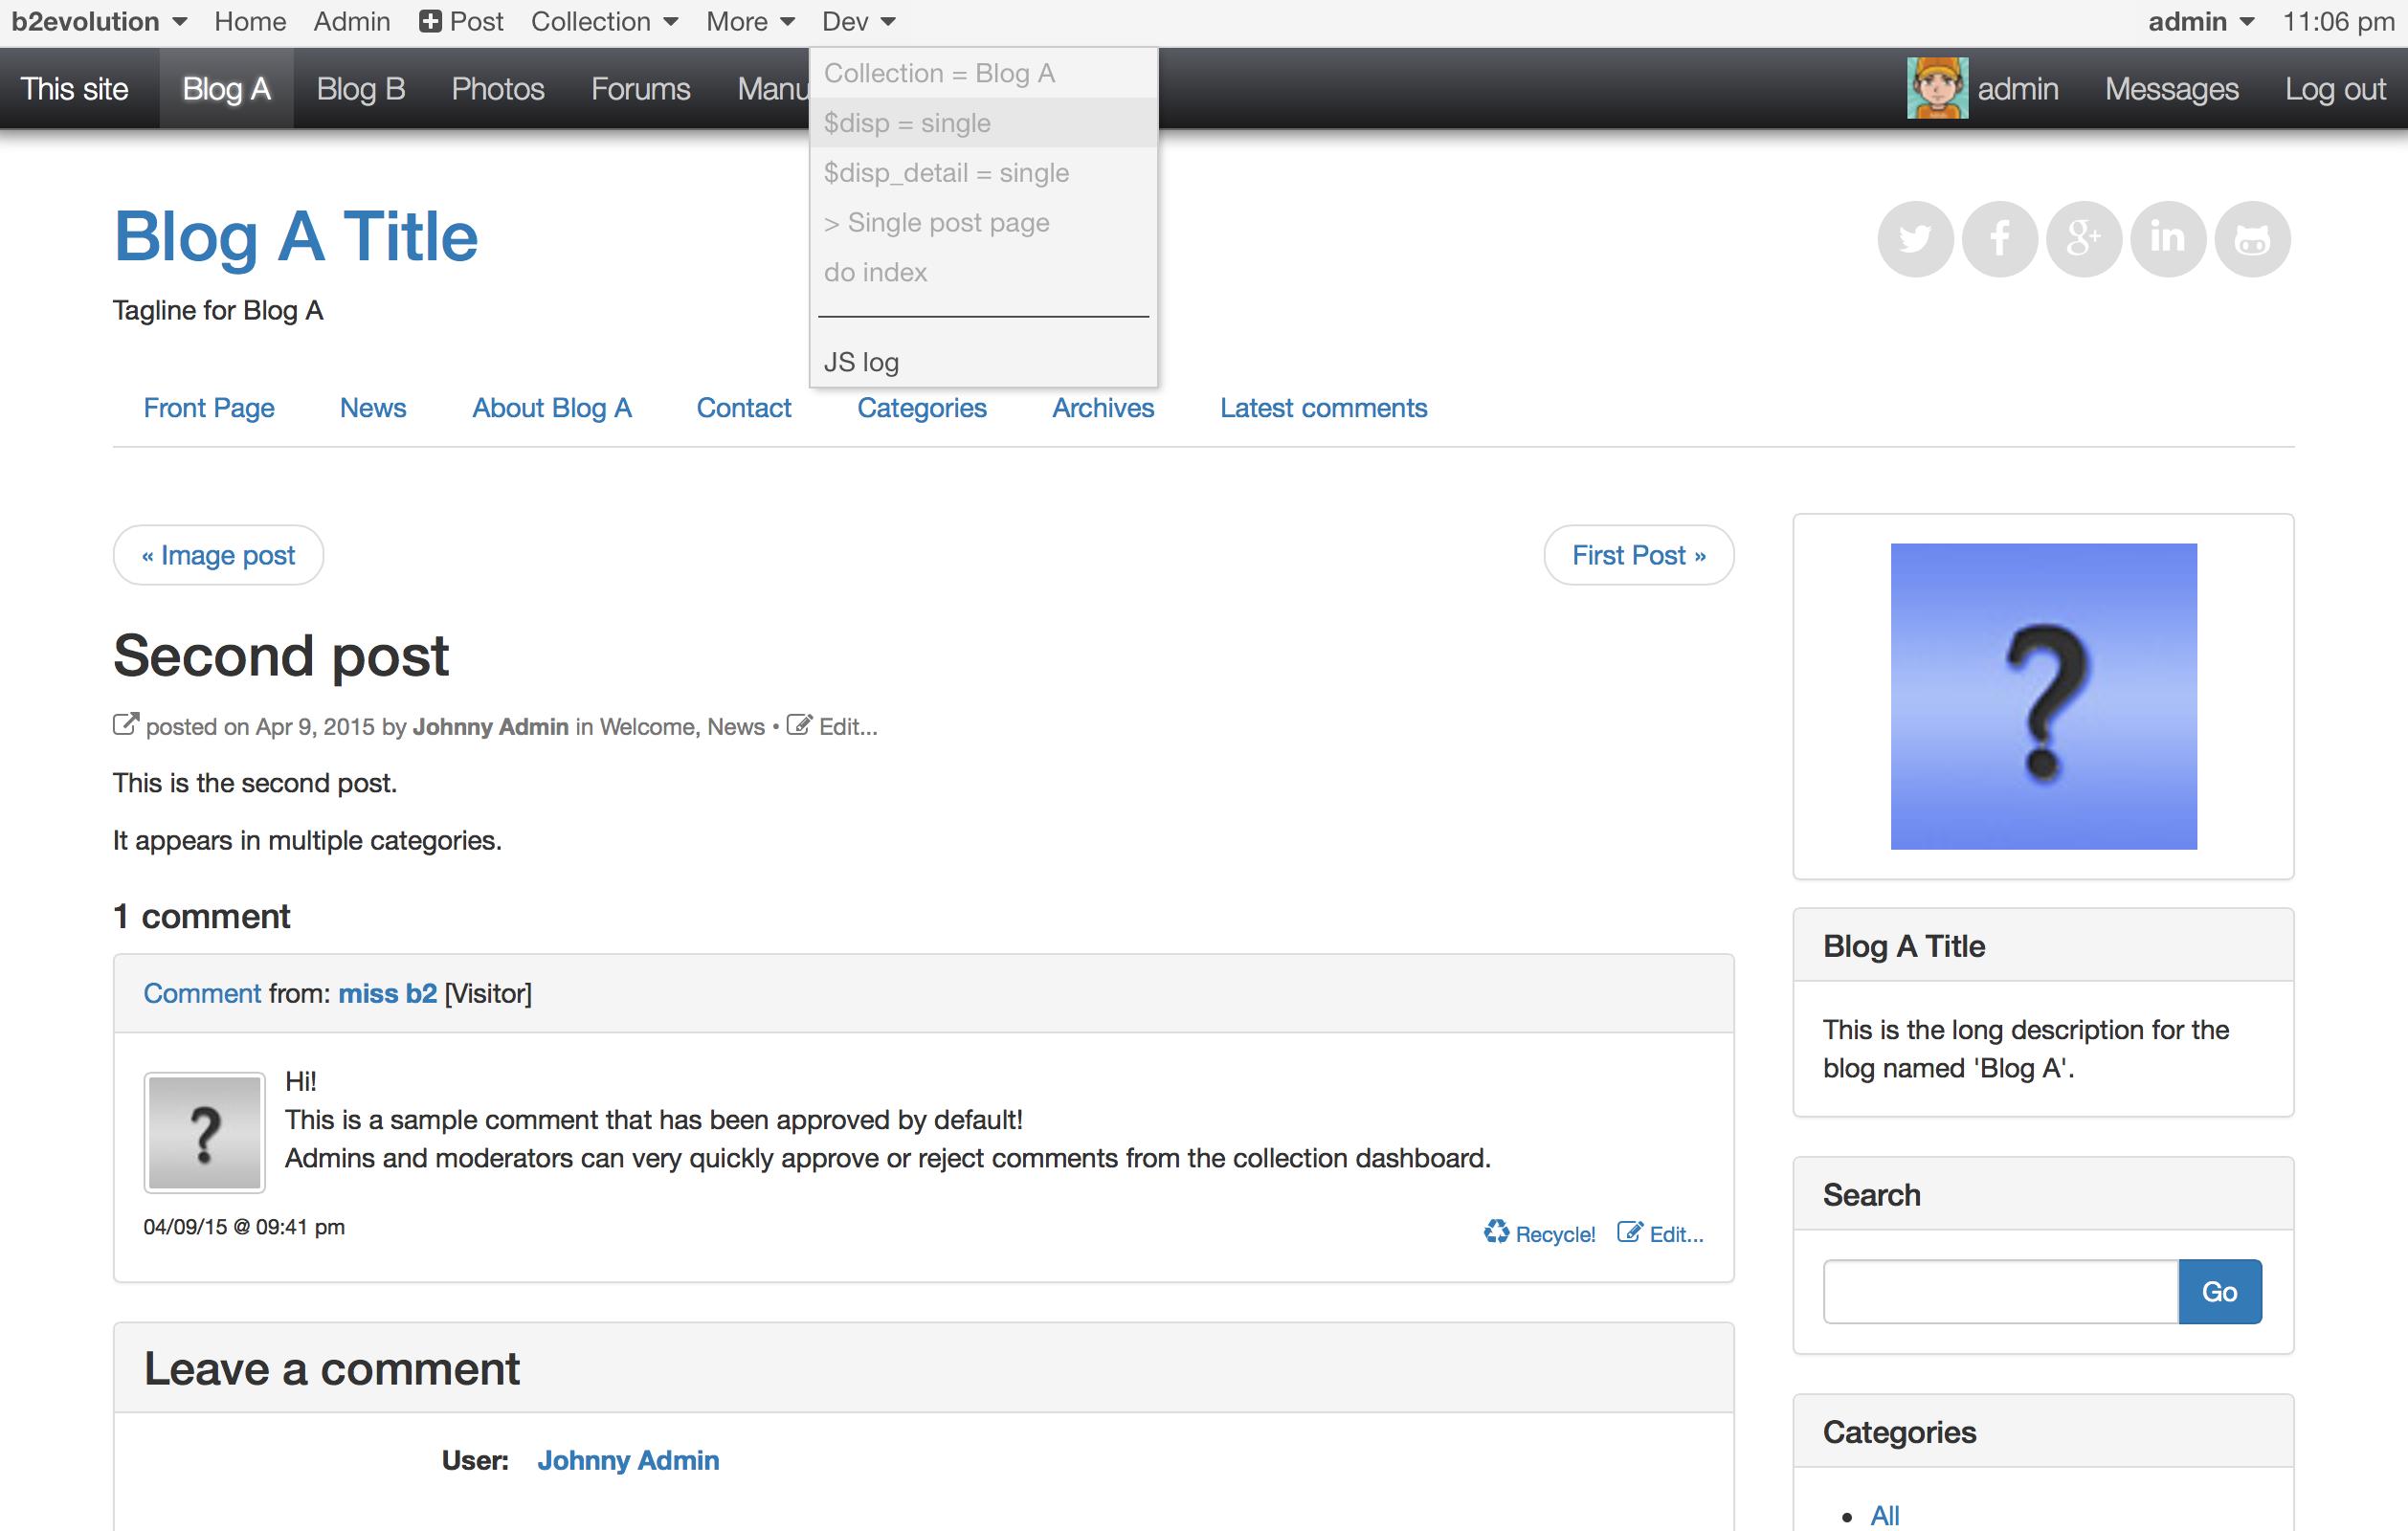
When you browse through different pages of a collection, look at the Dev menu and notice how the value of "$disp" changes. This is a direct mirror of the PHP $disp variable used internally by b2evolution. This is a key concept because the value of $disp will determine which "template" (which PHP file) of the current skin will be called to display the current page.
Here are some examples of different "disps" as we call them:

Each disp will actually try to call a different template, that is: a different PHP file in the skin folder to display the page. Each template can in turn include sub-templates. We’ll go into details later but you should know that you can actually see what happens by turning on "Show includes" in the "Dev" menu:
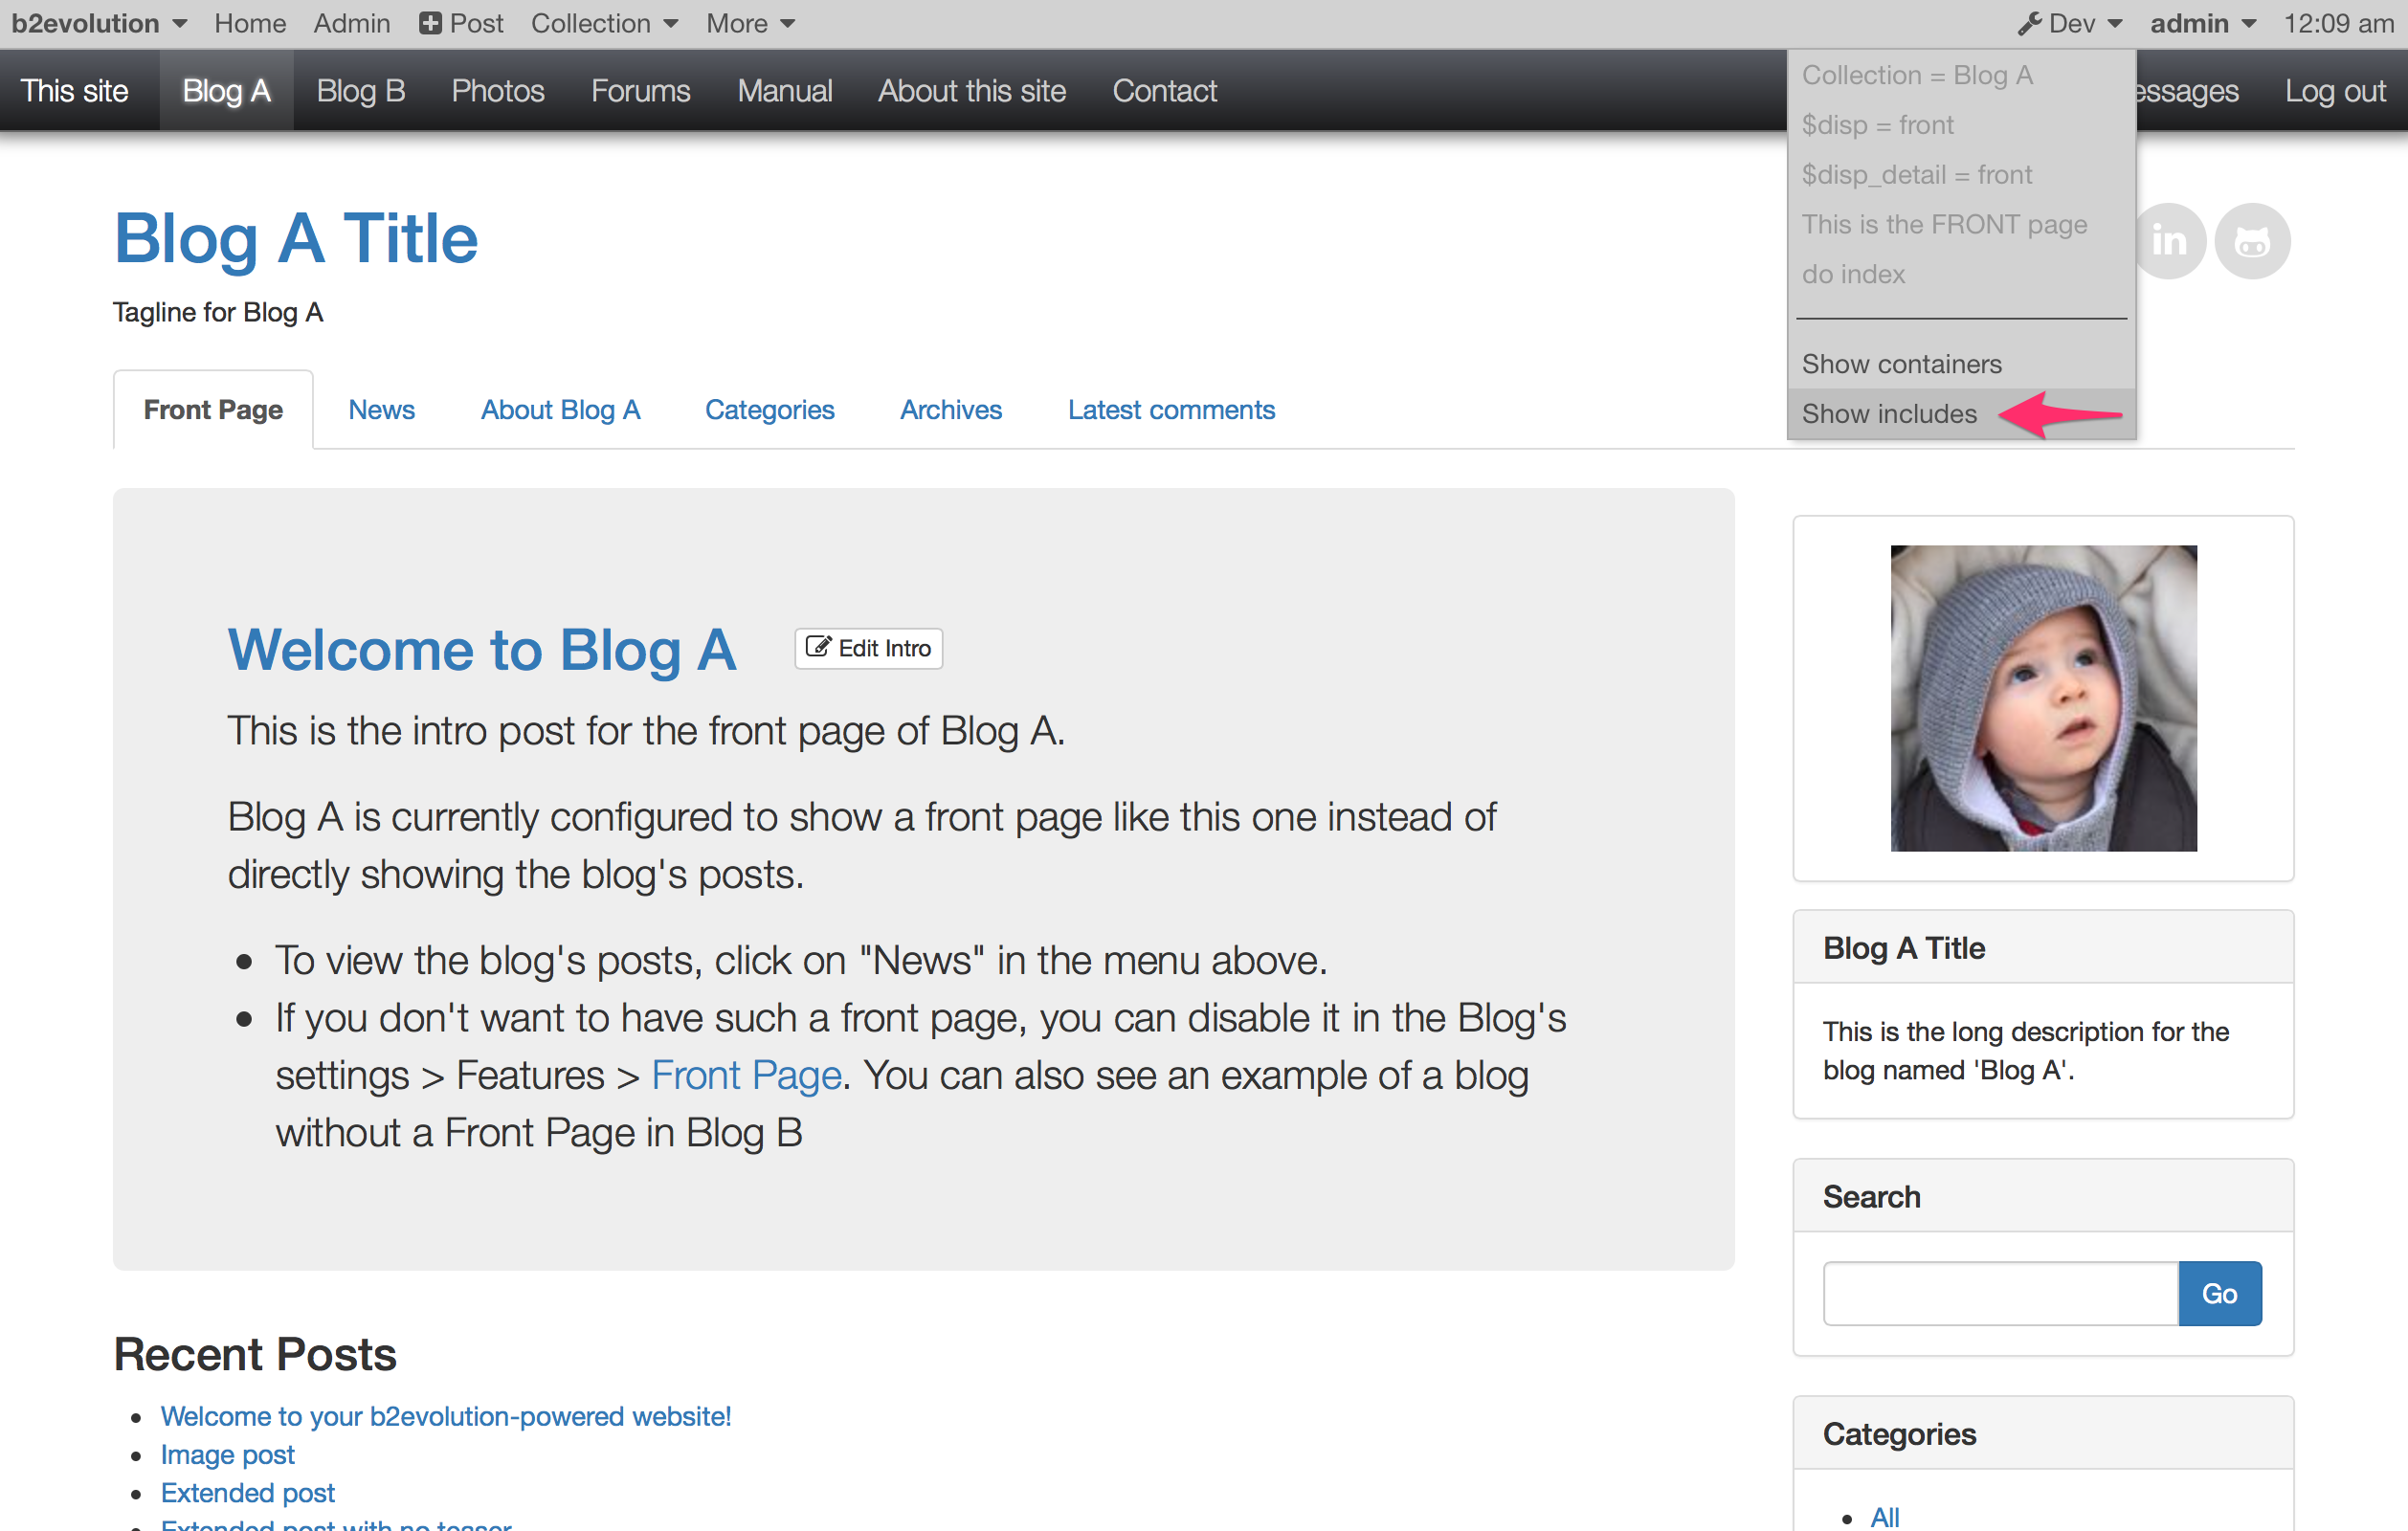
You will then see all the includes wrapped in a green box:

Note that if you have "Site skin" turned on (it is enabled by default), then you will also see the global "site-wide" header and footer wrapped in purple boxes.
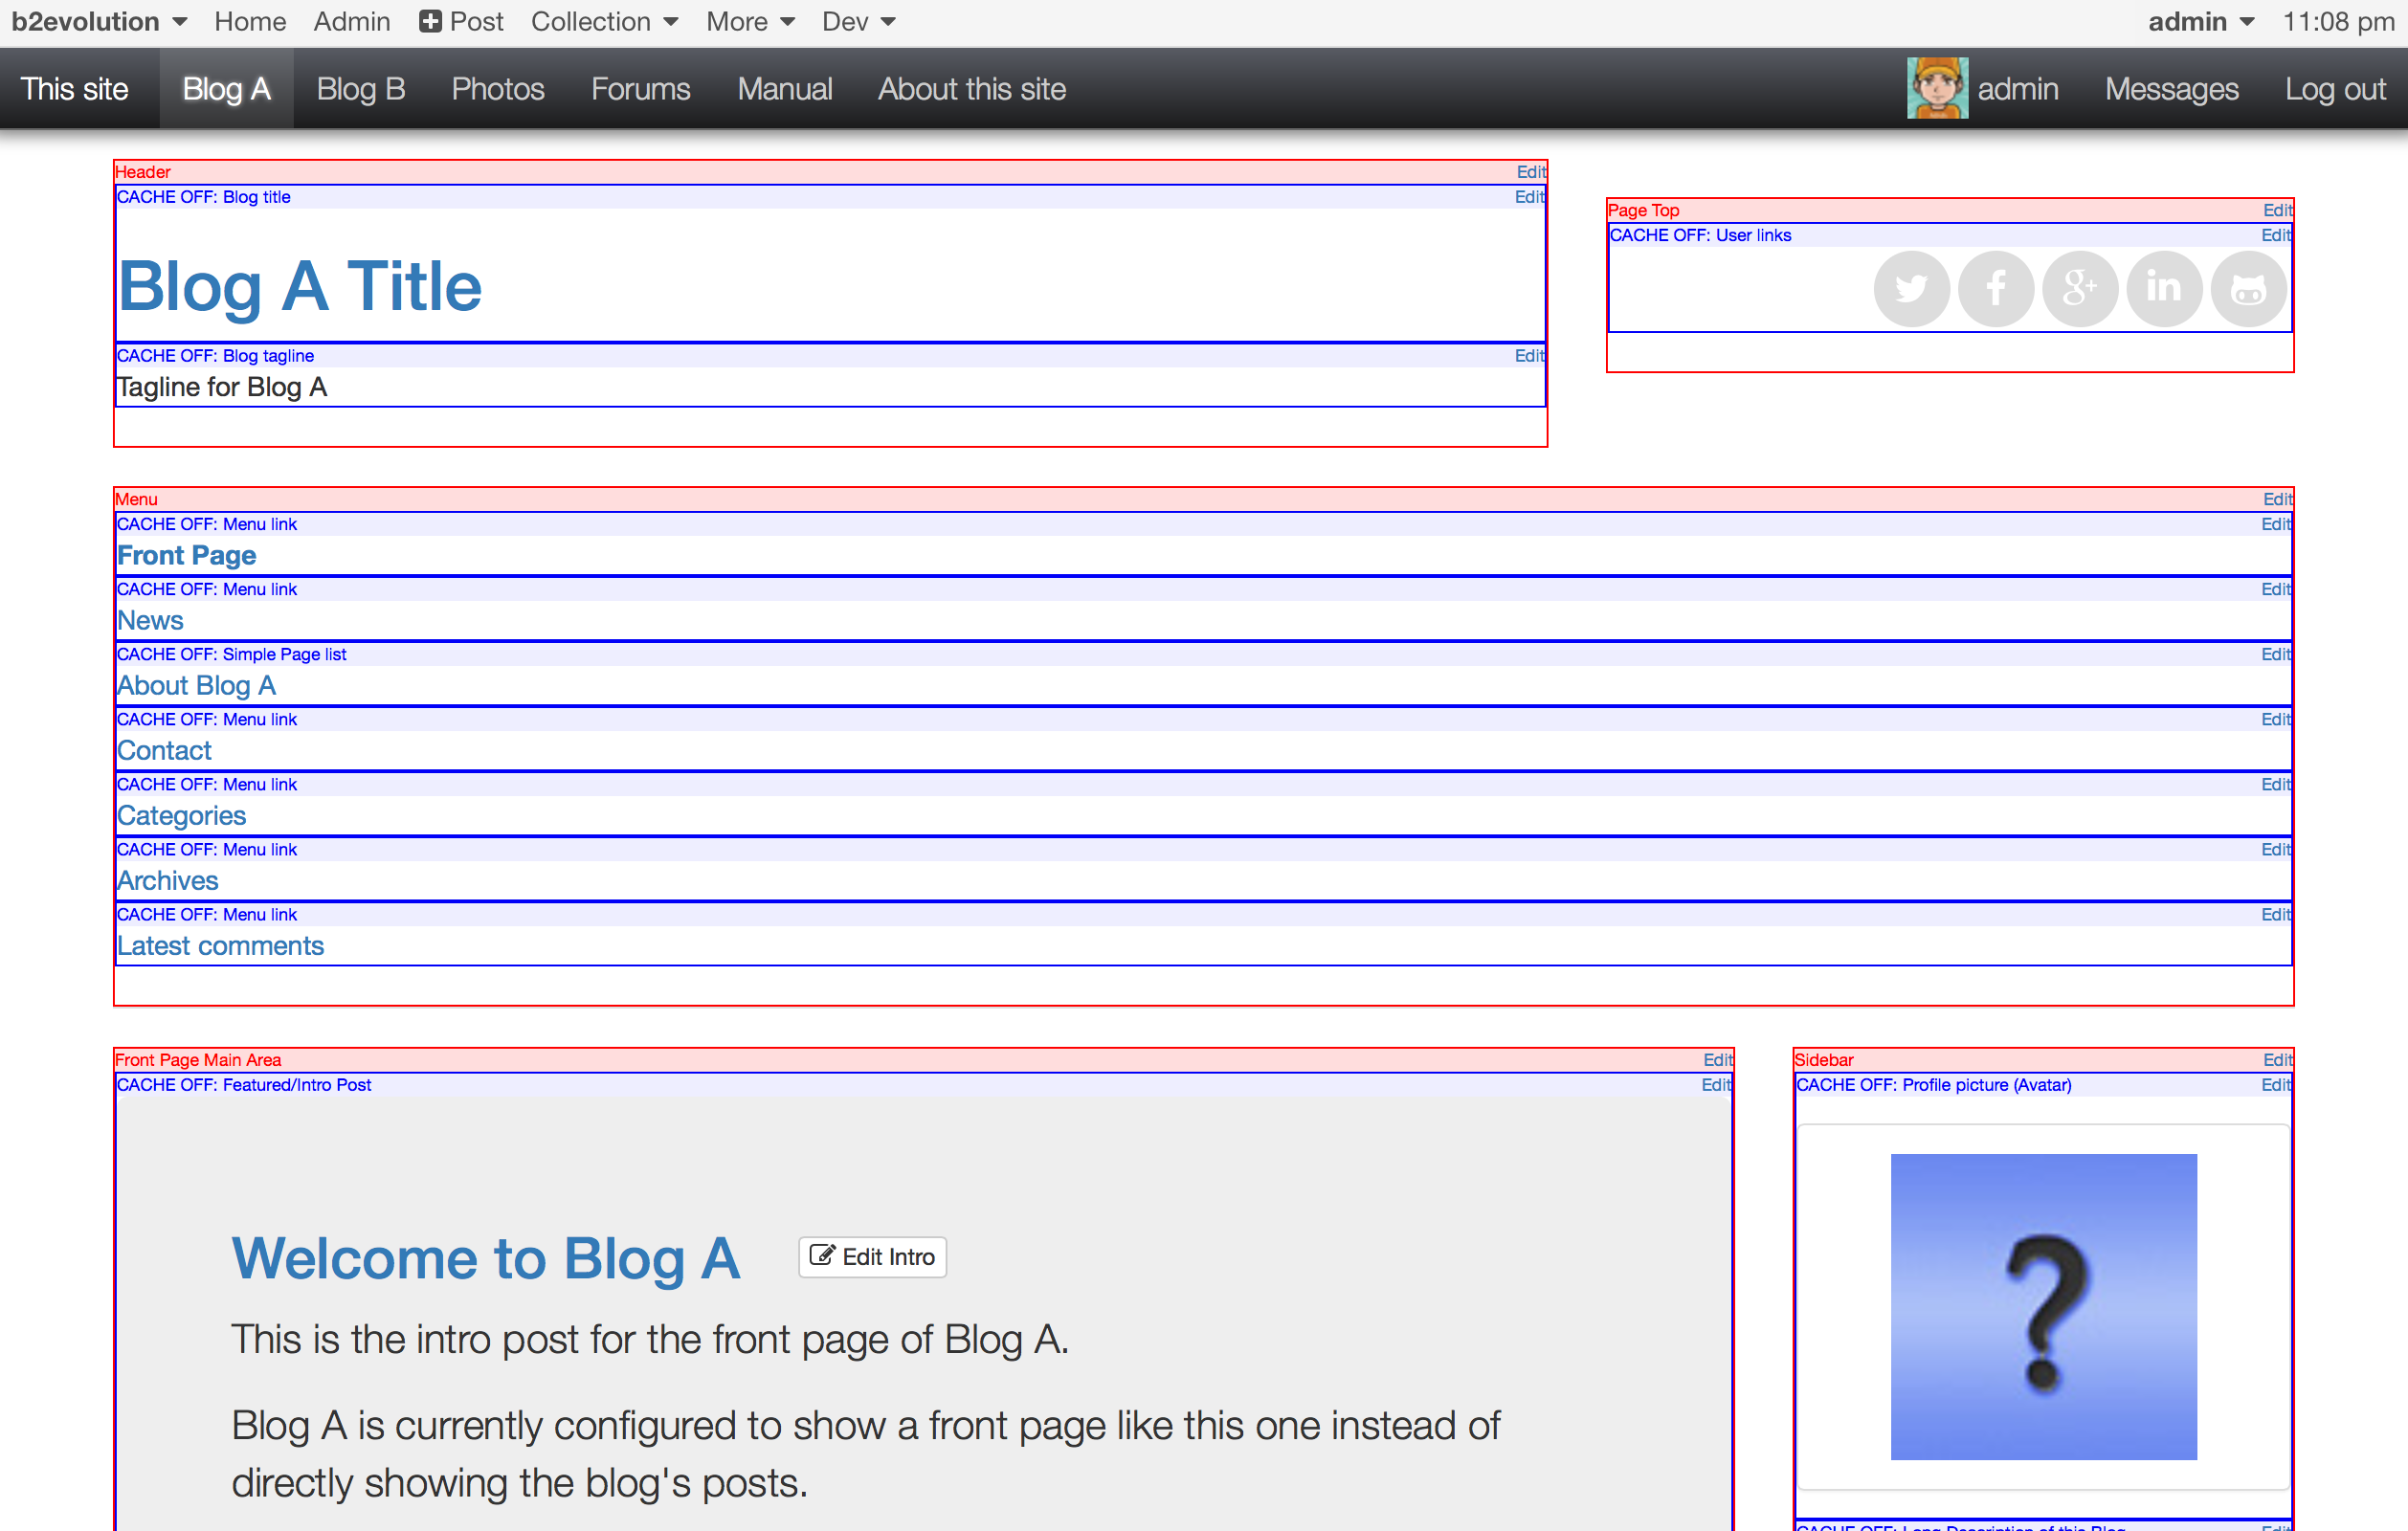
Each disp/template of a skin will display some hardcoded HTML and some dynamic PHP but the bulk of the content will come from Containers.
Inside the Containers you will find Widgets. The administrator of a b2evolution website can easily move widgets around inside a container or even from one container to another.
To better grasp the concept of Containers and Widgets, you can activate the "Show containers" option in the "Dev" menu or in the "Collection" menu:

You will then see a red box around each Container and a blue box around each Widget:
Your challenge as a skin designer will be to build designs that work well with a variety (not to say an infinity) of possible arrangements of widgets in your containers. Fortunately, the current trends in responsive "block" design makes this easier than it used to.
If you click "Edit" in a red box or if you use the "Collection > Widgets…" menu, you will access the Widget manager screen in the Back-office:
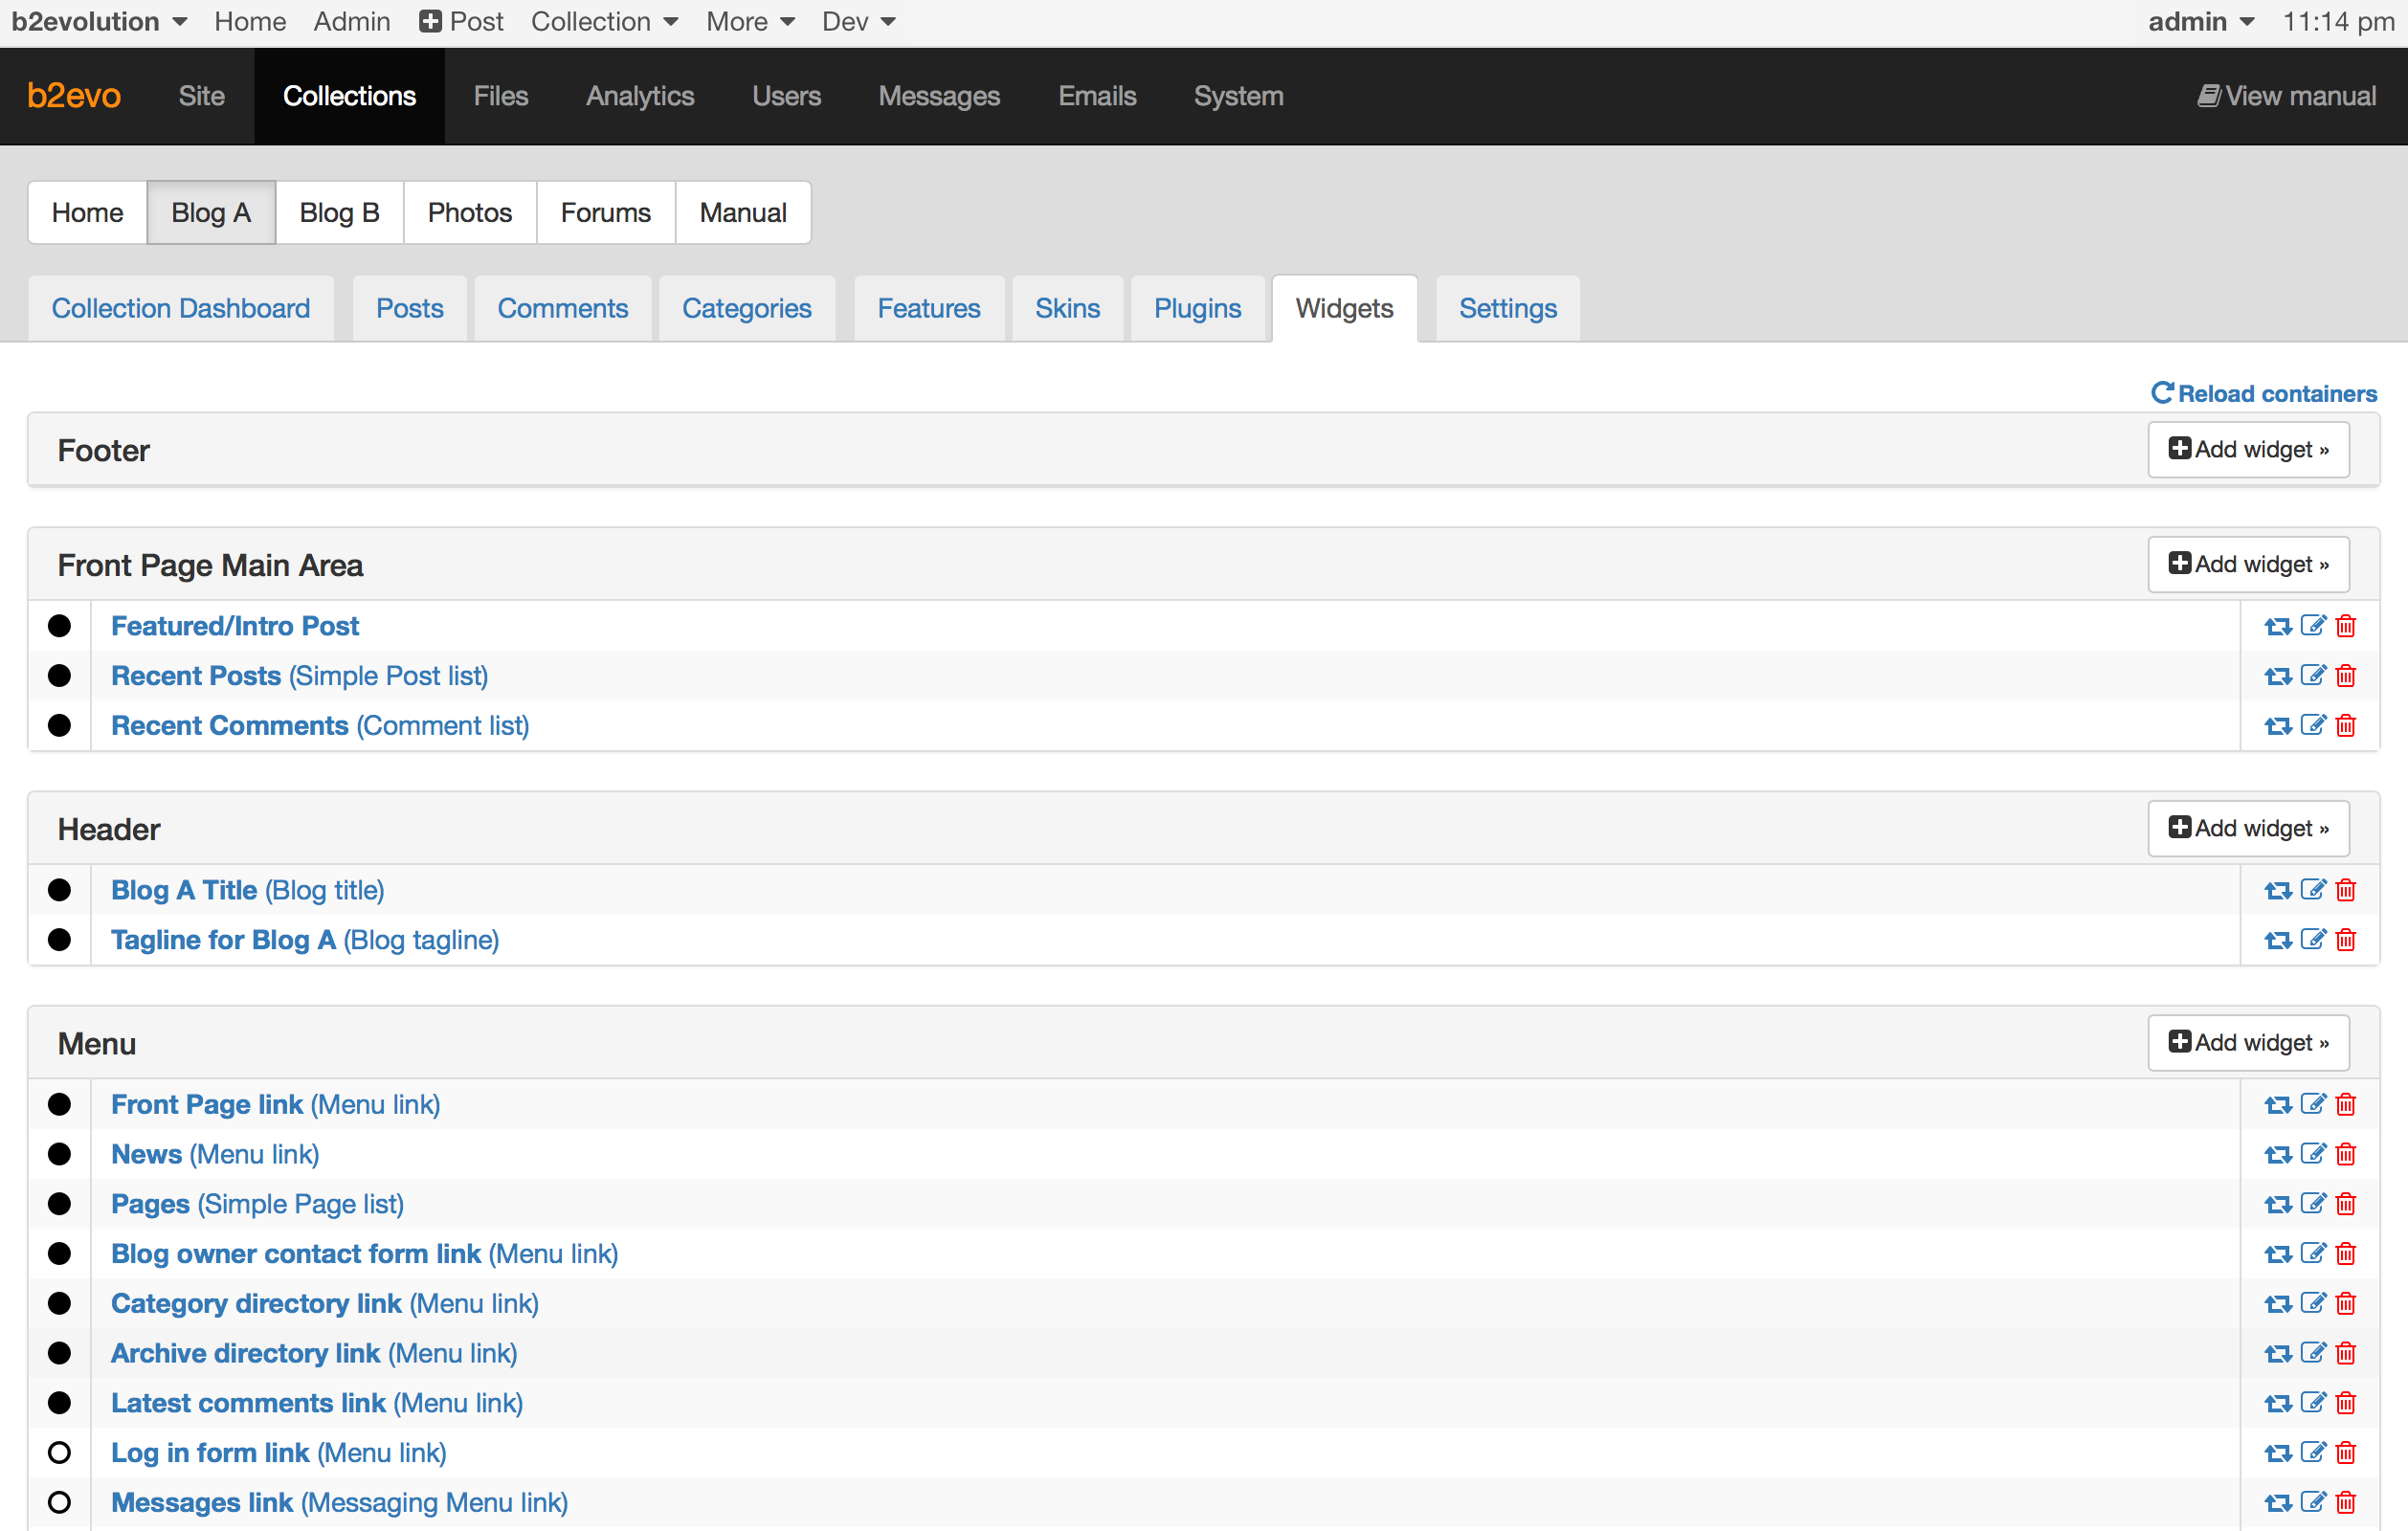
The above shows all the containers of the current skin and the widgets they contain. It may even show containers that are not in the current skin but that still contain widgets (which you might have added in a previous skin you used for this collection). This way you are sure never to lose a widget which may contain fine tuned customizations.
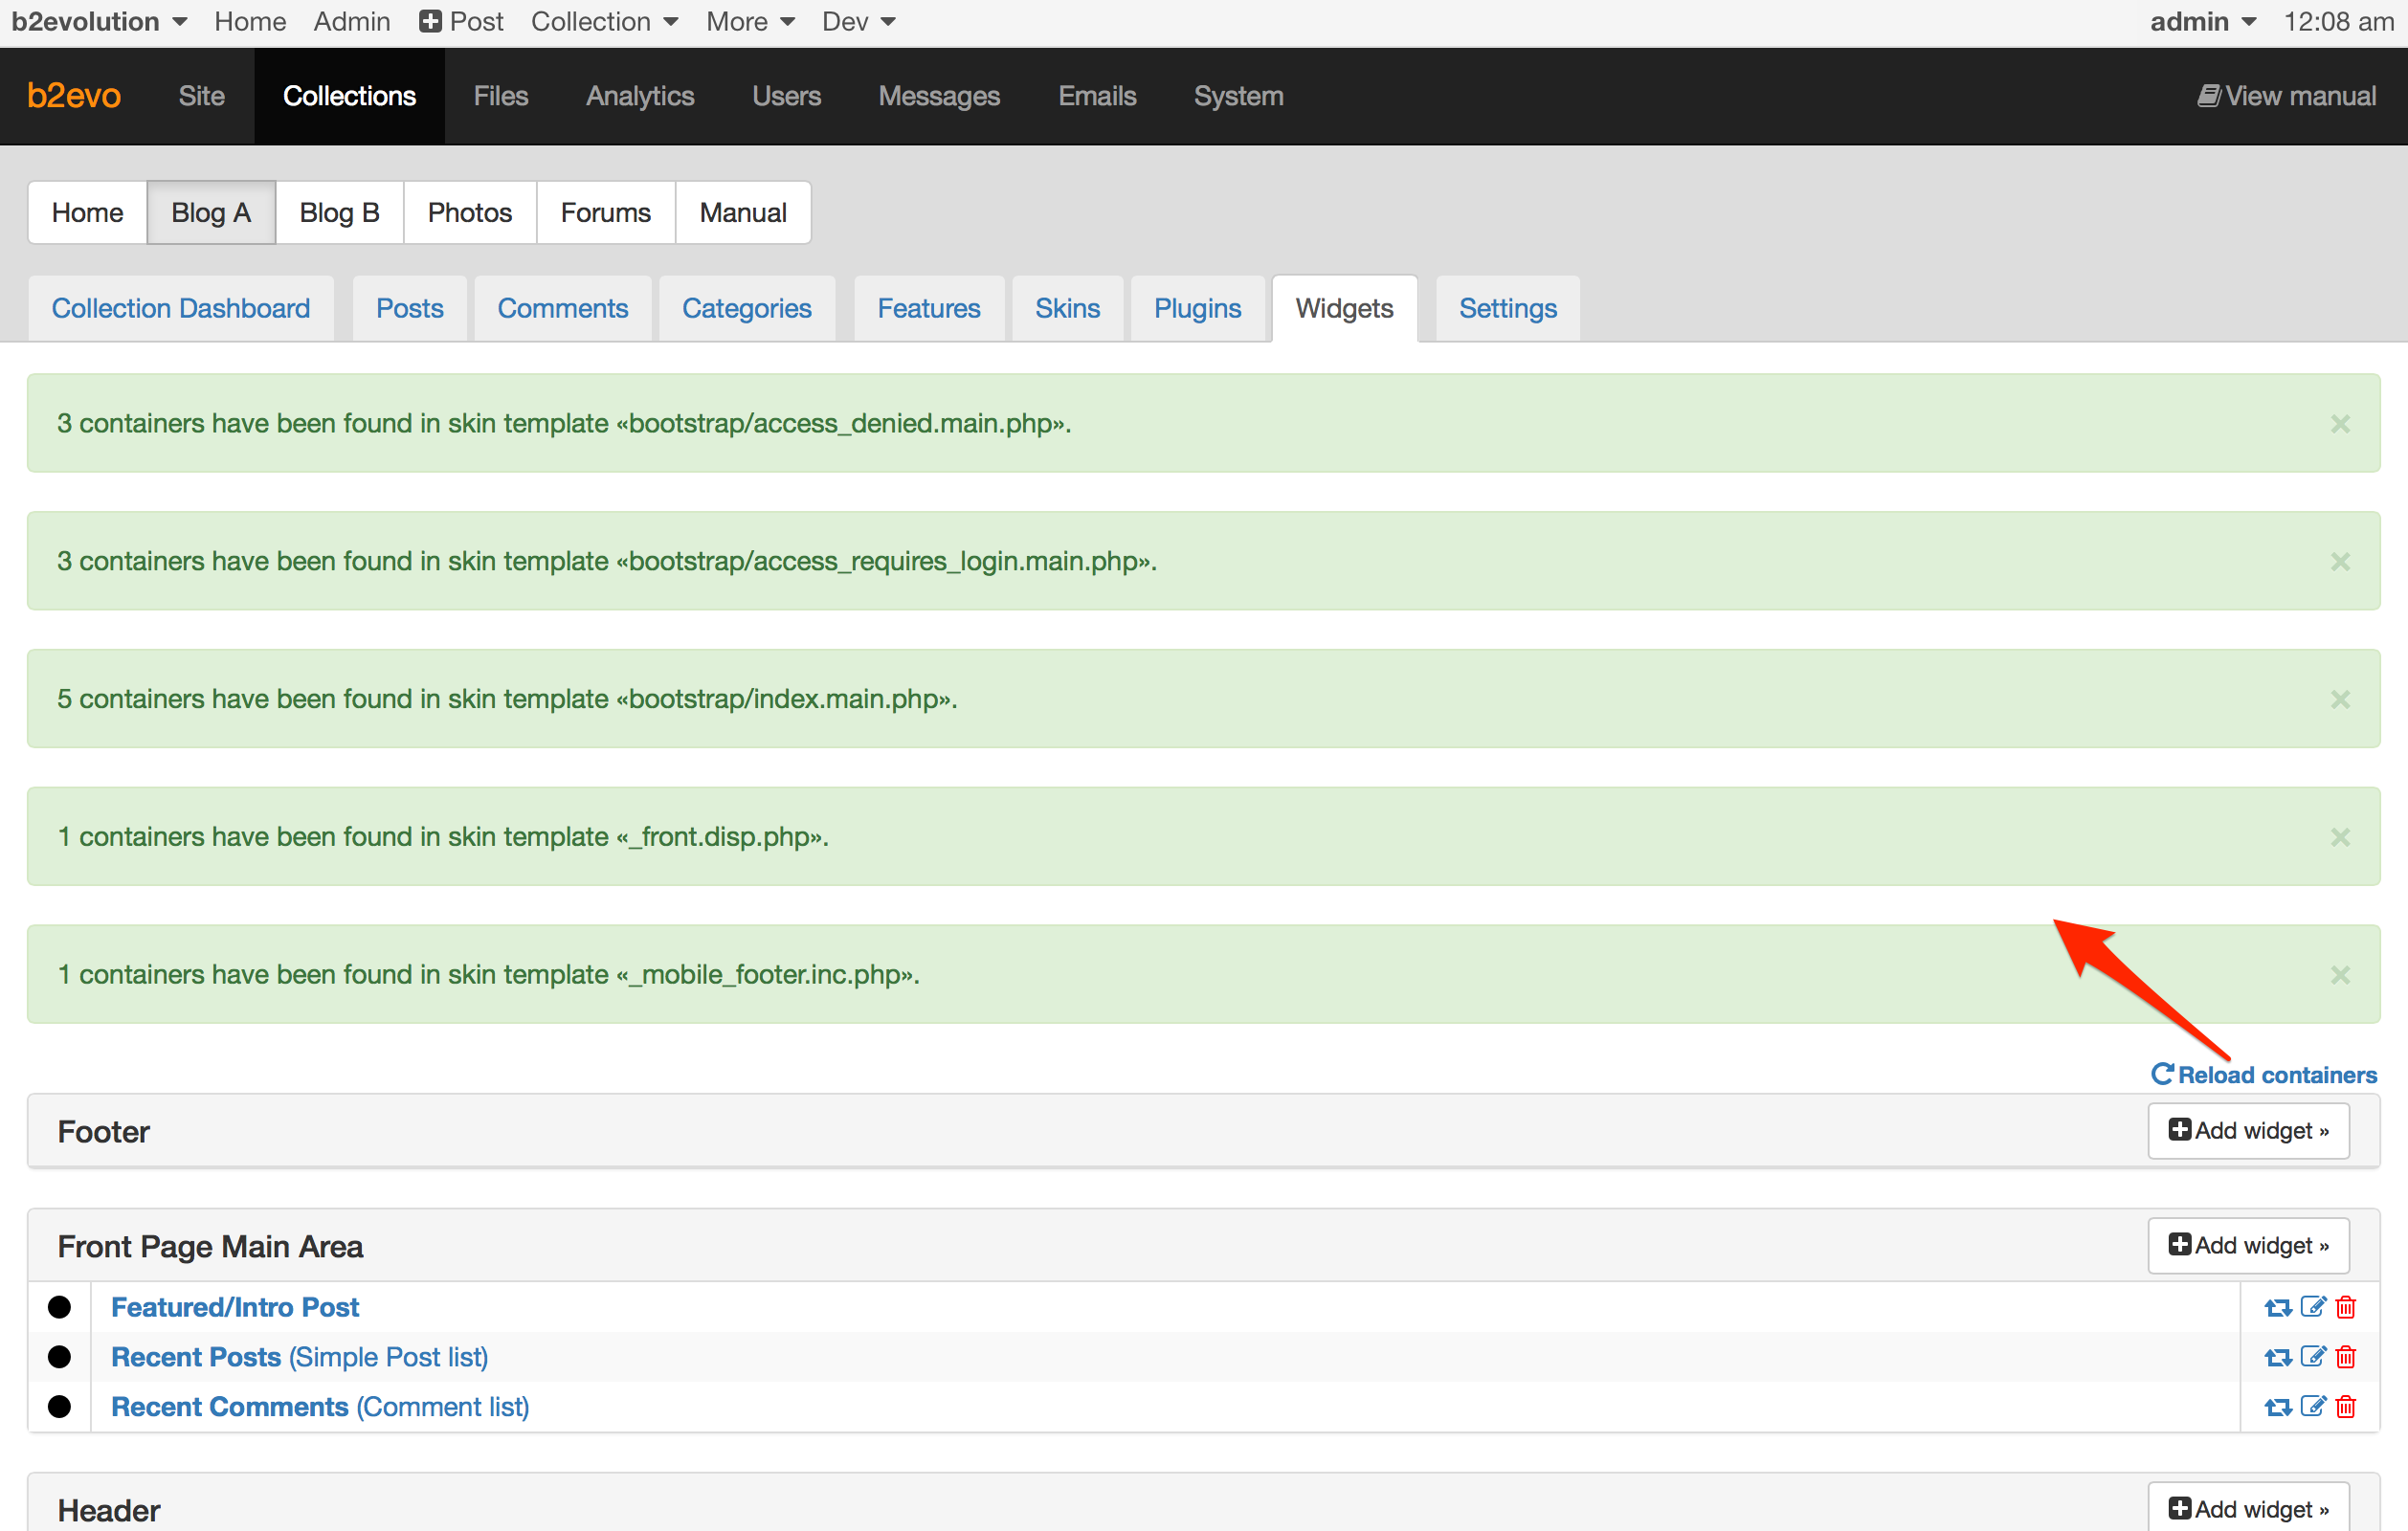
Note the small link "Reload containers" at the top right. You will need this when you add a new container to one of your skin templates. When you click this, b2evolution will scan all the templates of the current skin and look for newly added containers. (It will also notice removed containers):
Note: in future versions of b2evolution, skins will explicitly declare a list of the containers they want to use with some added benefits, but this is not fully implemented at the time of this writing.
Widgets are under the control of the site administrator. At the time of developing a skin you don’t really know what widgets will be put into which containers… but you should definitely experiment with a variety of combinations that make sense!
By default b2evolution installs demo widgets in a series of "common Containers" which are used by almost all skins. This is not only a good starting point for testing a skin design, you should absolutely positively make sure that your skins display correctly out of the box with these default widgets. Otherwise your skins will look broken to most users who test them.
Of course you can and should also let your skins support more elaborate widgets combinations!
Here are the basics to manipulate widgets and try different combinations:
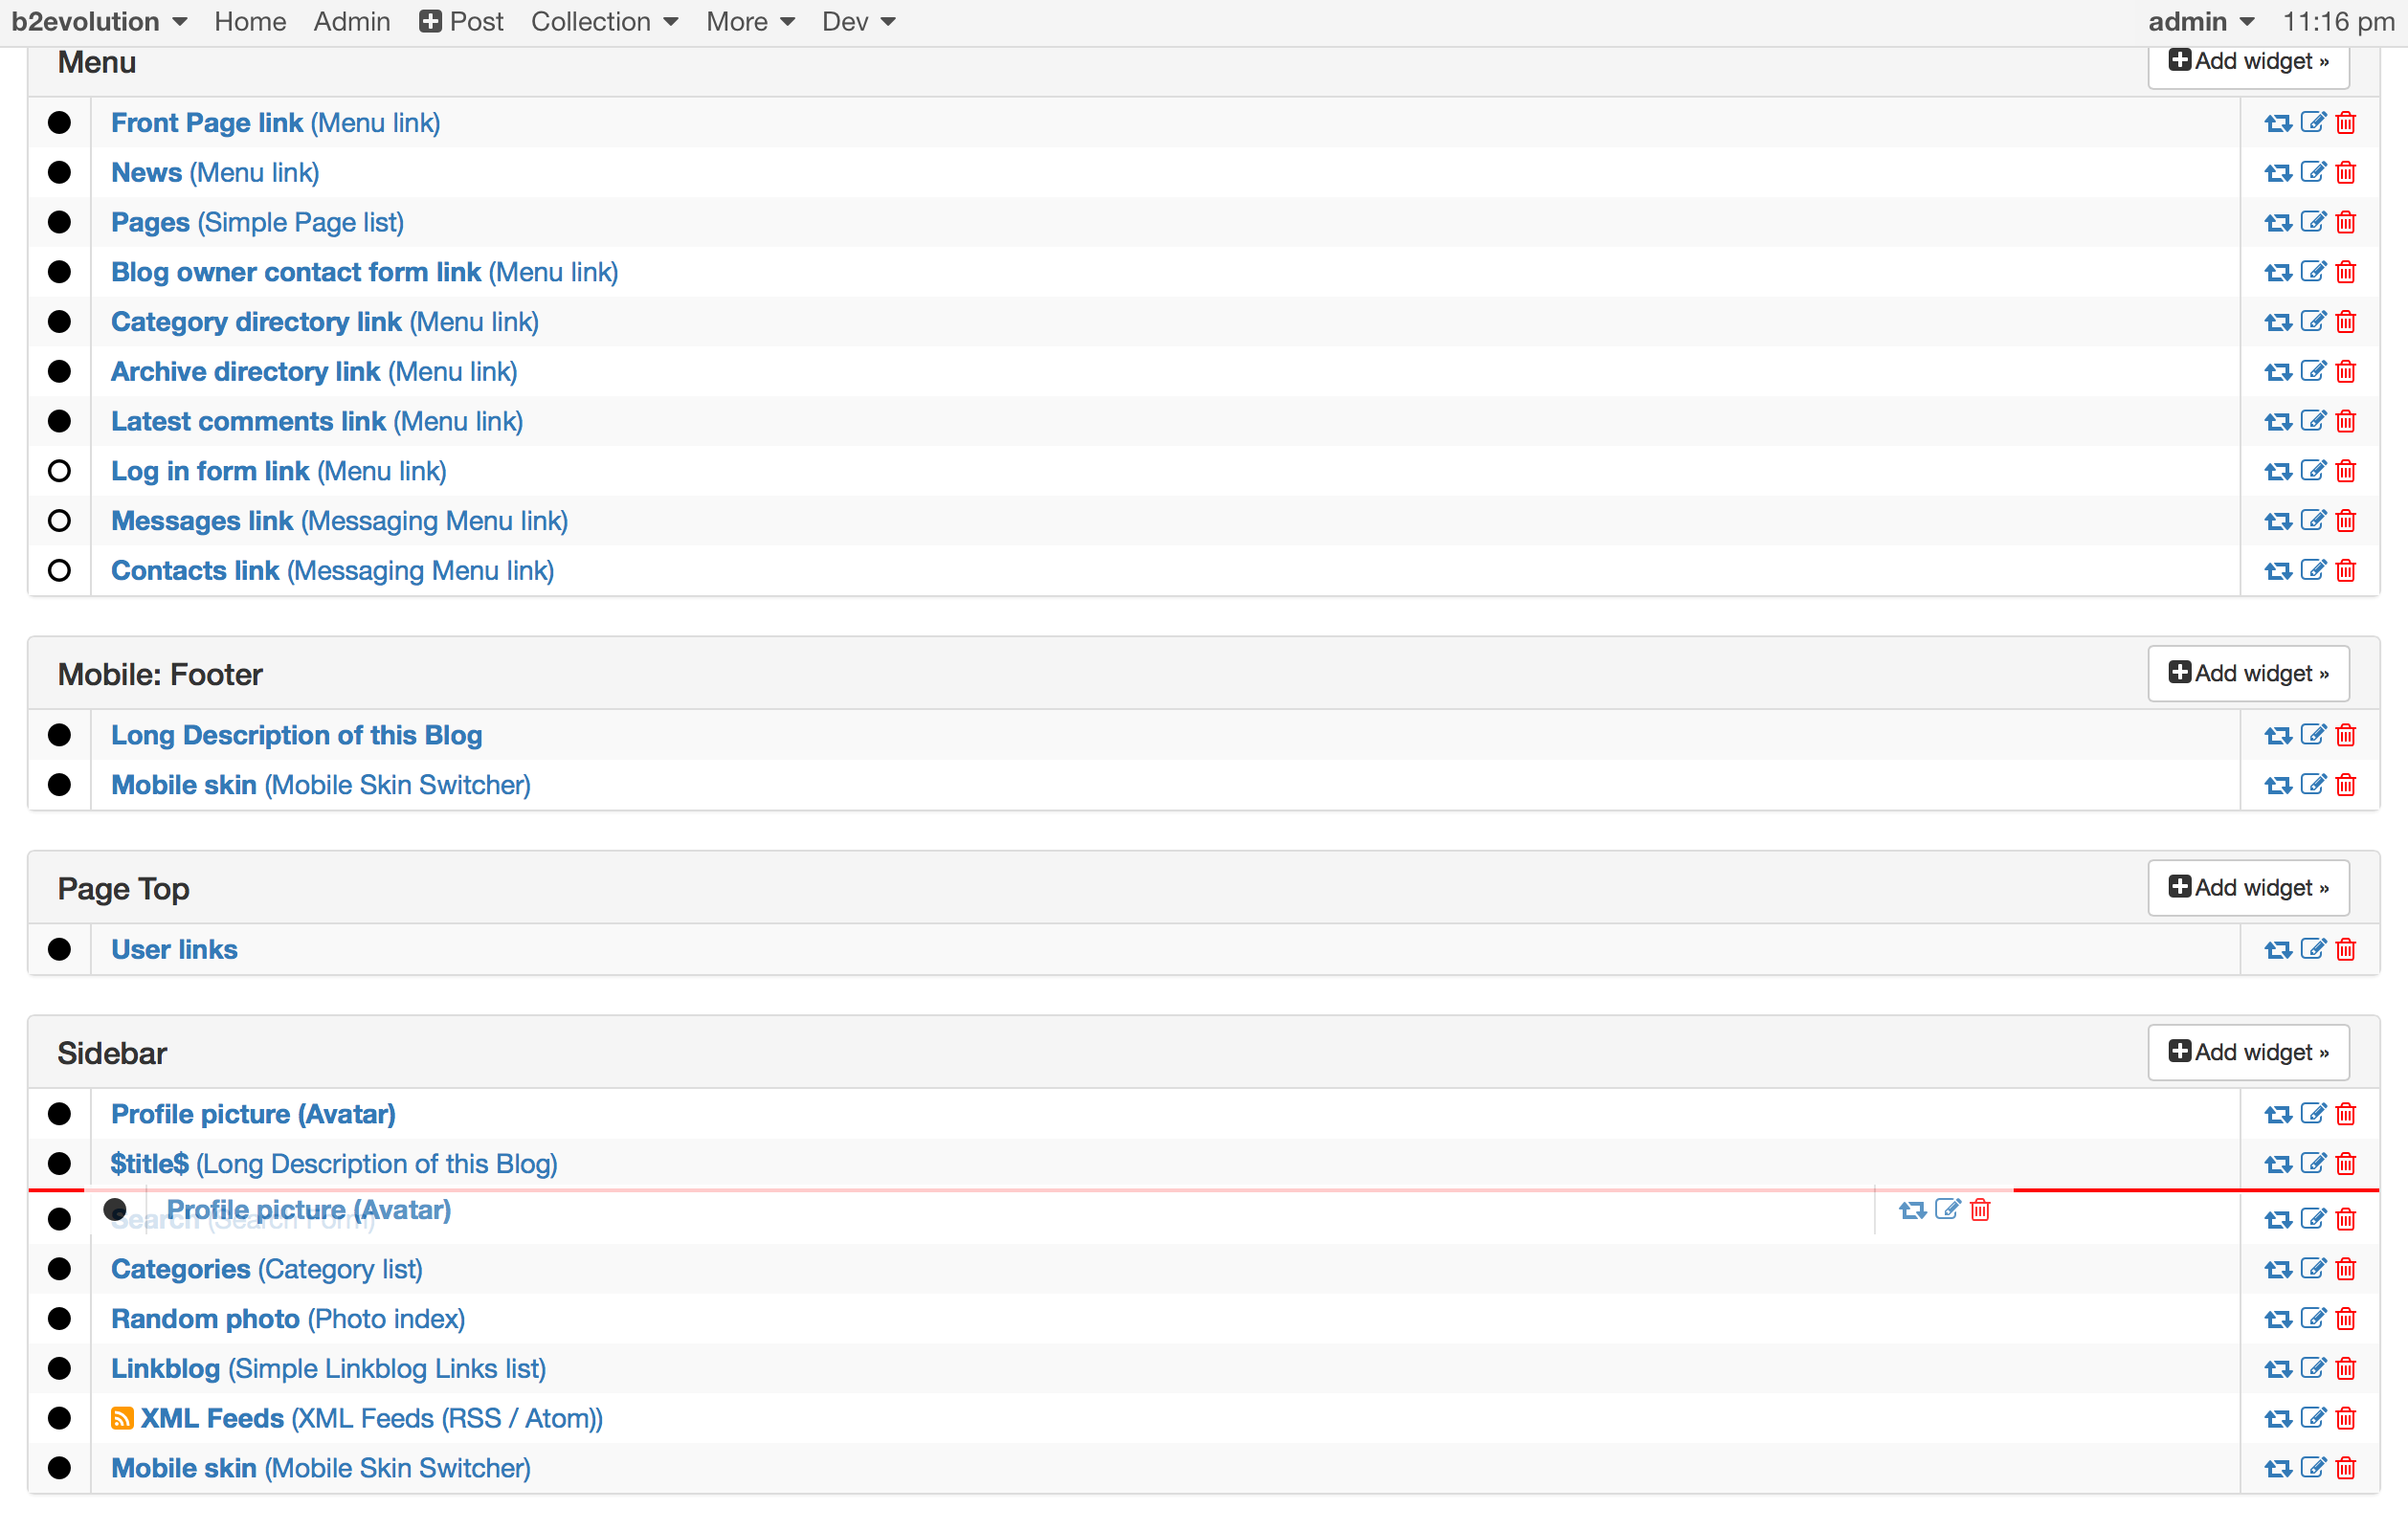
Move widgets by simply dragging and dropping them at another place (including a different container):
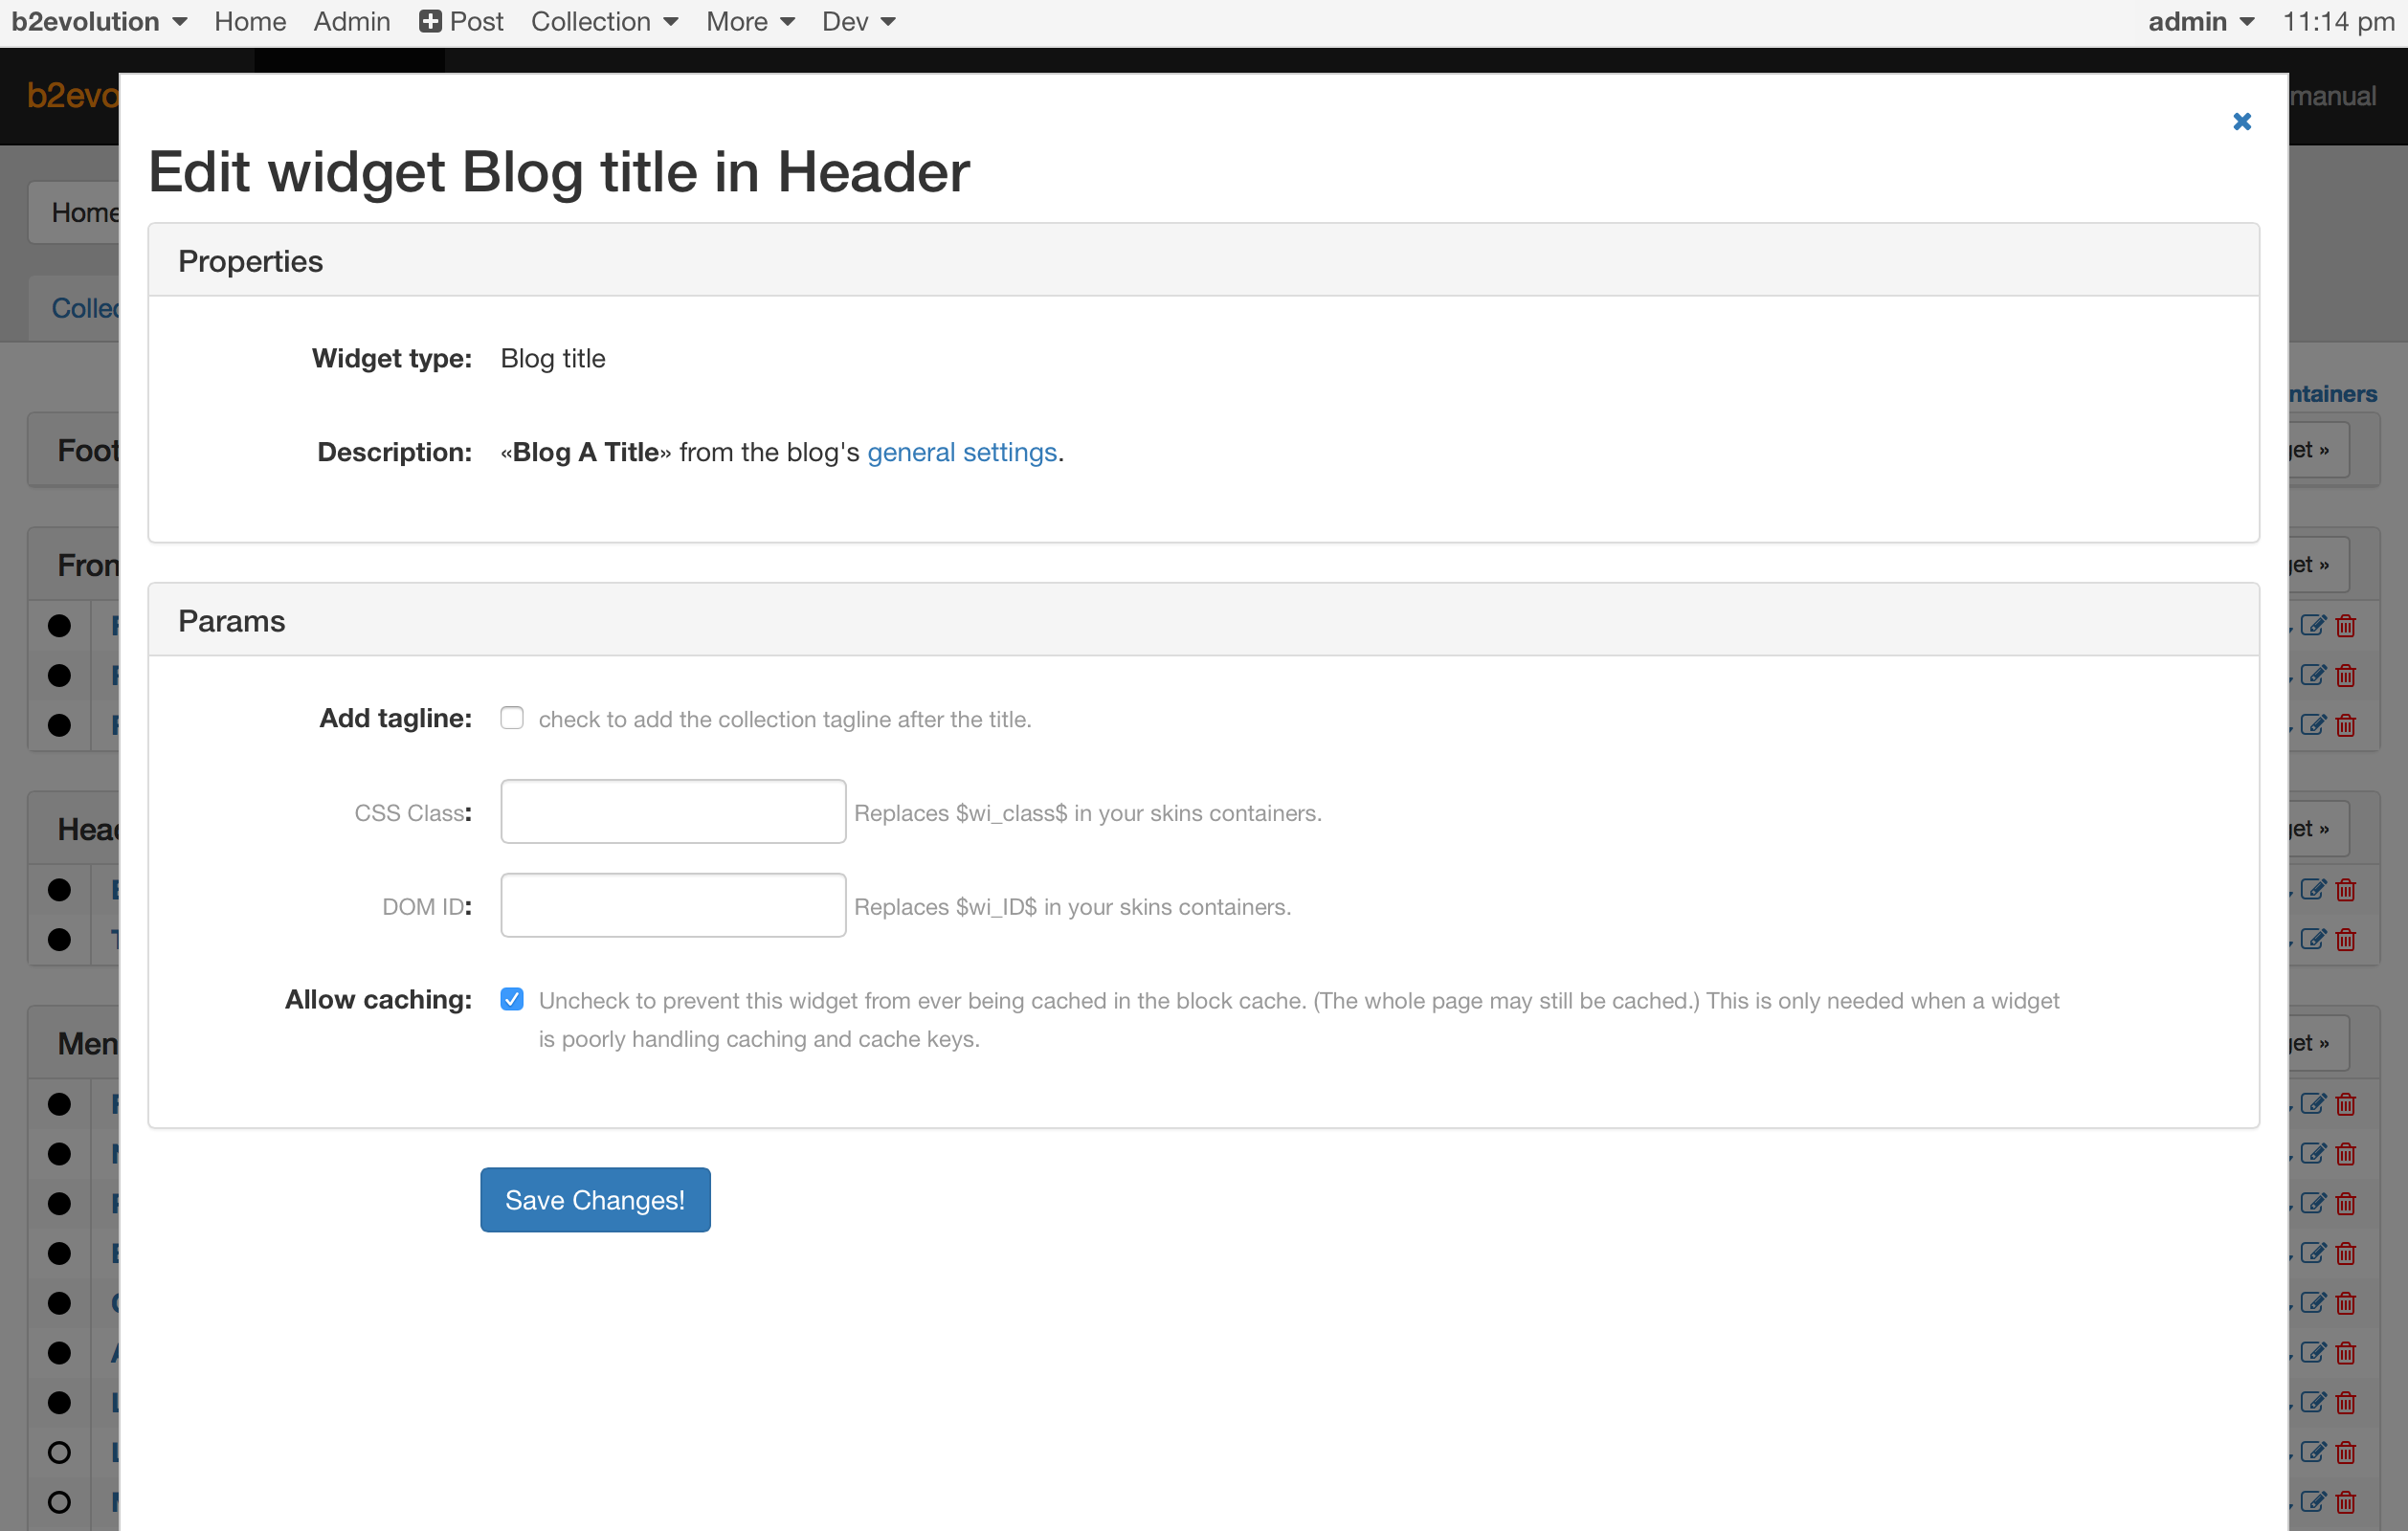
Each Widget has a properties panel to configure the level of details that it will display:
Each Container has an "Add widget" button that can be used to add a widget to that container:
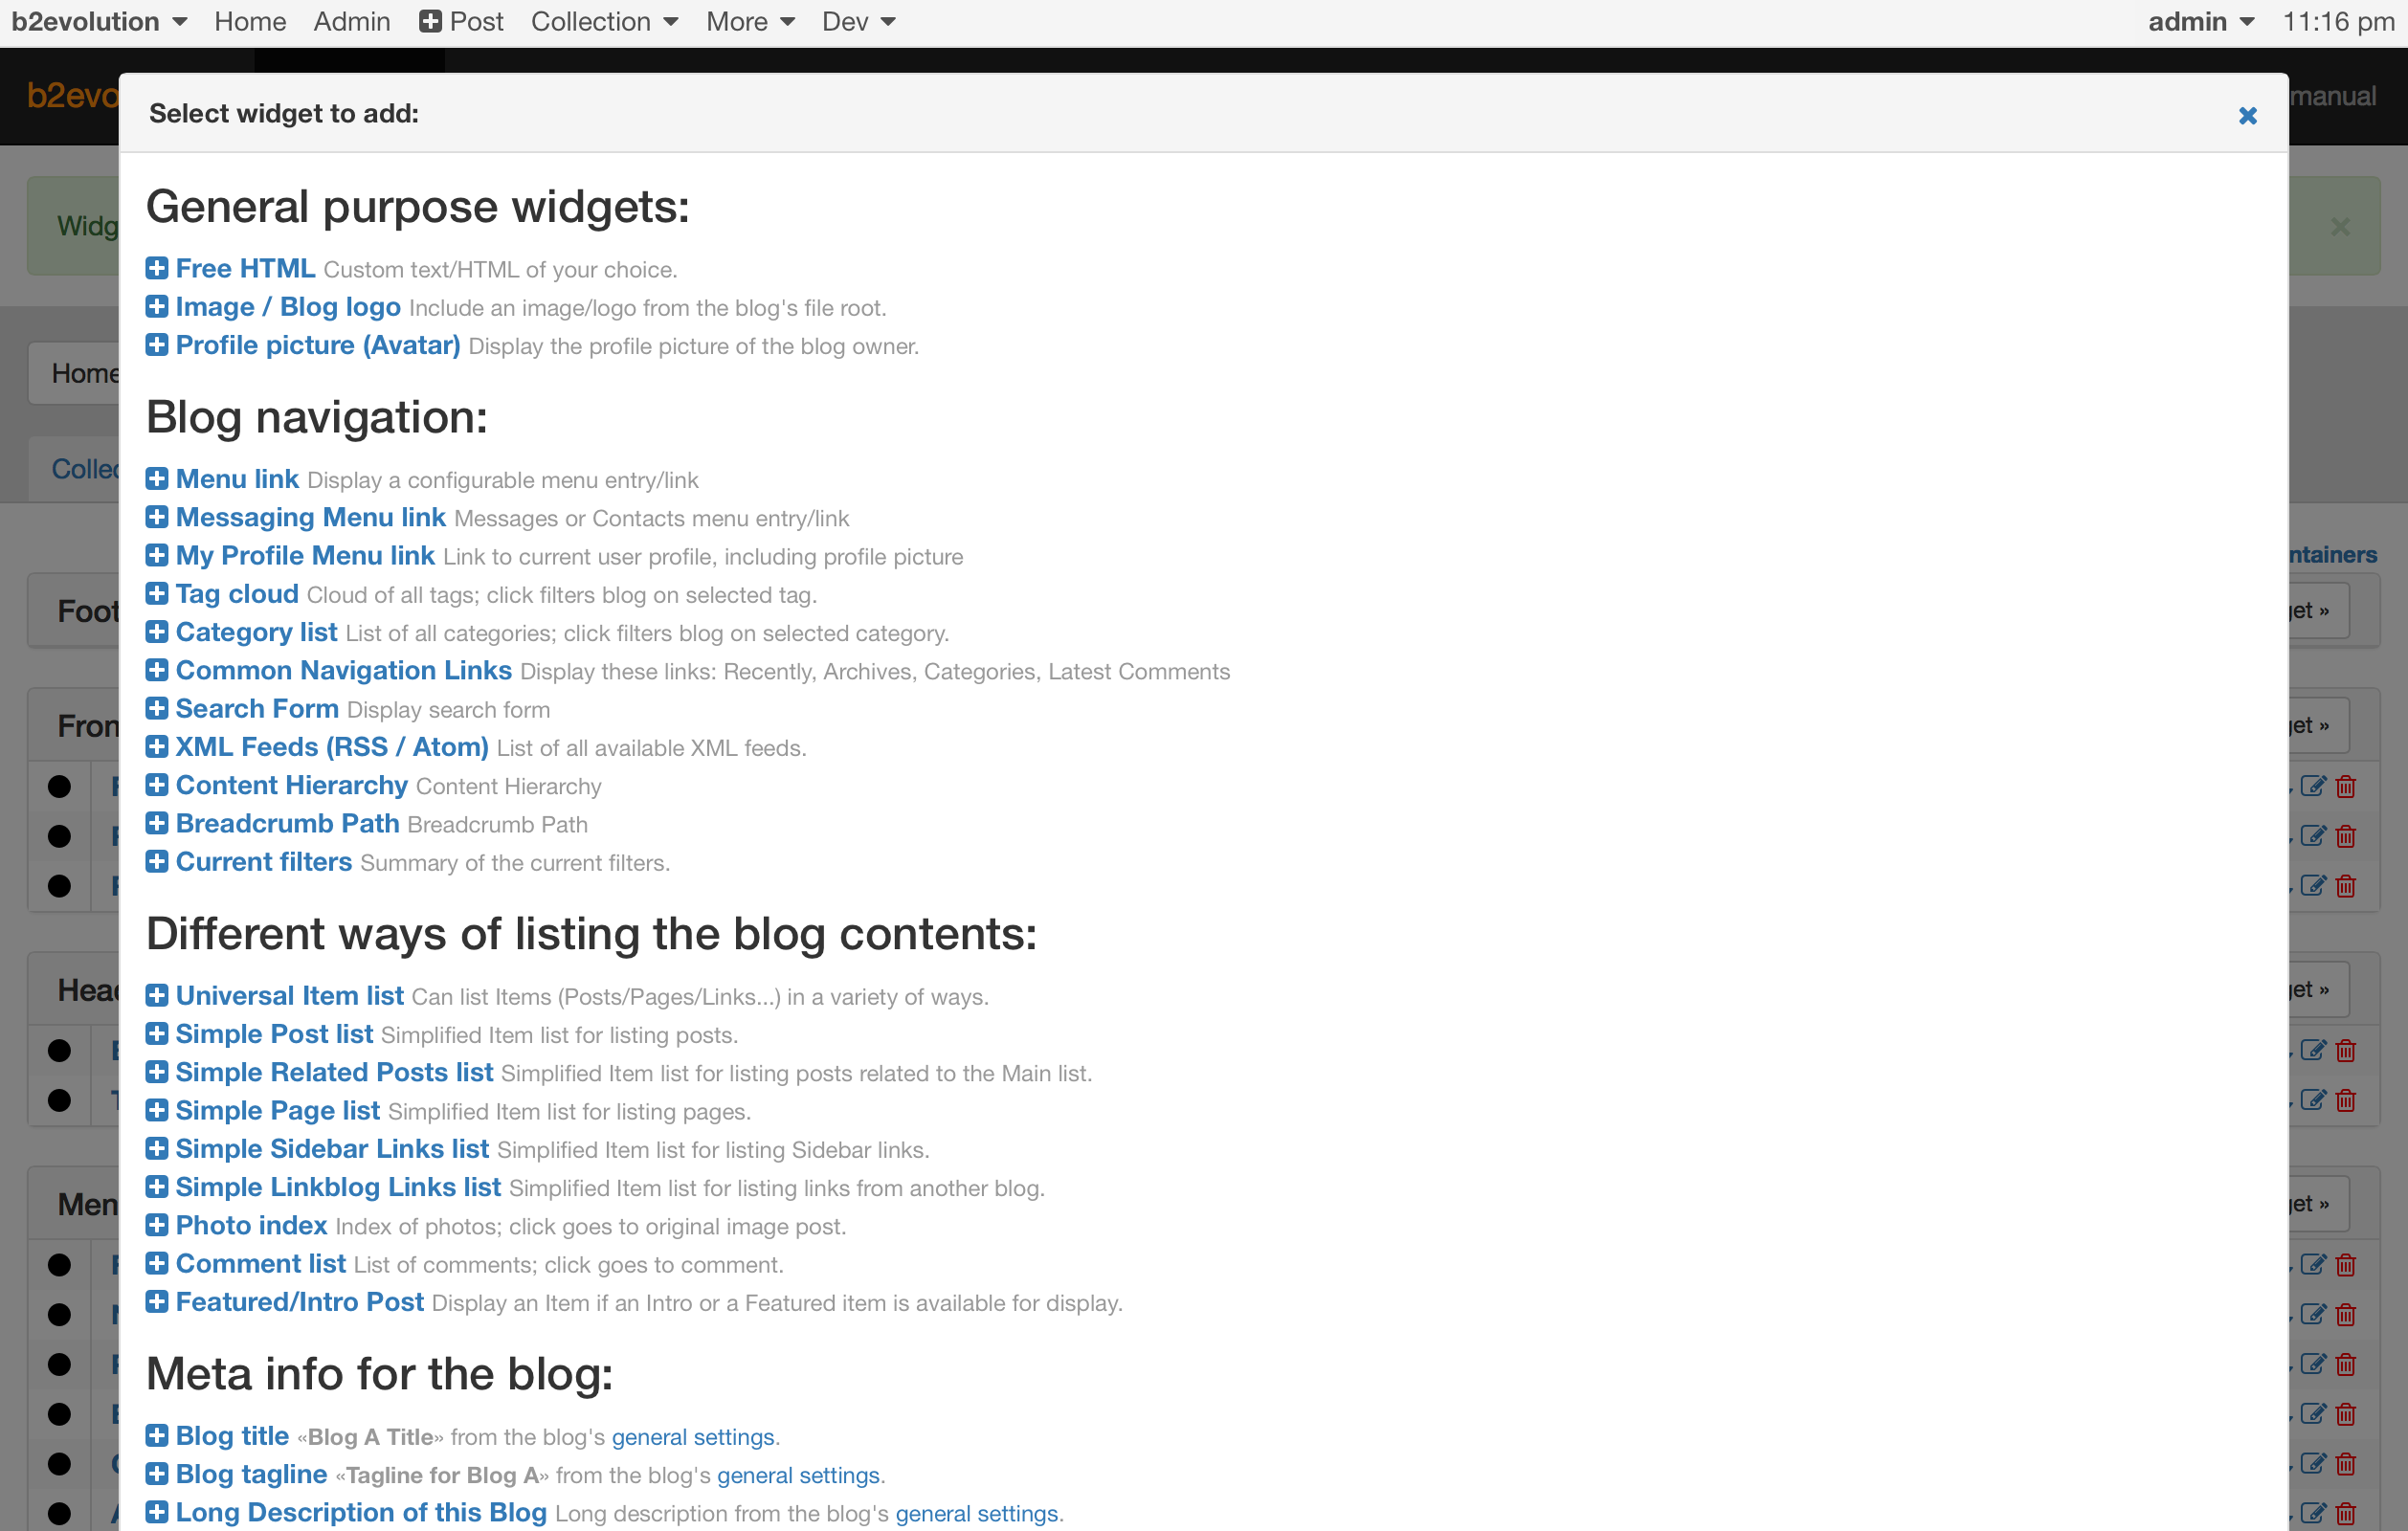
Note: At this time, the list of available widgets is long and difficult to grasp without trial & error. If you are a graphic designer and think you could design one expressive icon to identify each widget, please talk to us ;)
Here we will go into details about the files and folders that make the skins work…
/skins/ folderIn b2evolution’s root directory, you should find a folder named skins with contents similar to this:
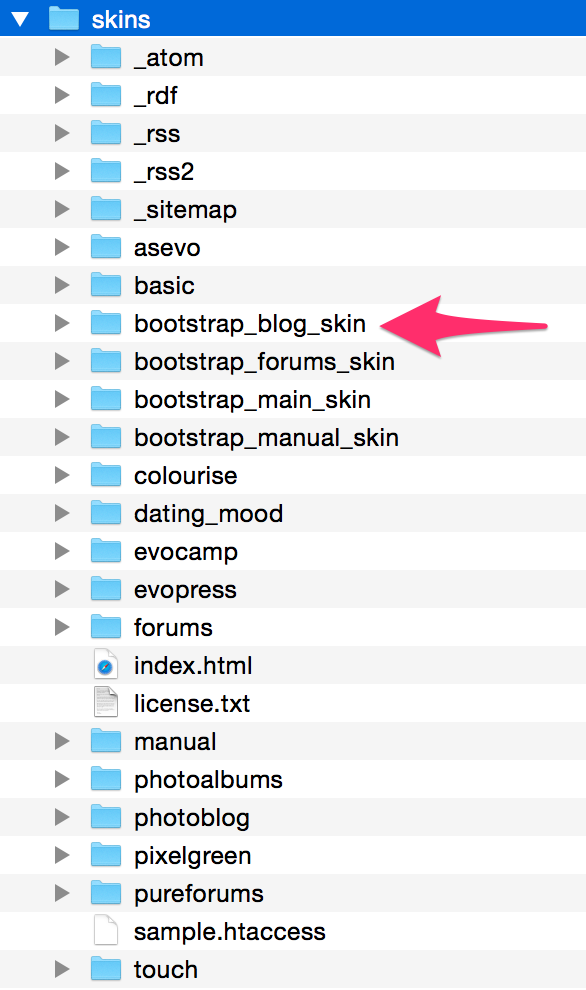
Each of the sub-folders of the skins directory represents (and contains) an actual skin.
In the example above the skin we were looking at is the one in the bootstrap_blog_skin folder. Let’s open that folder:
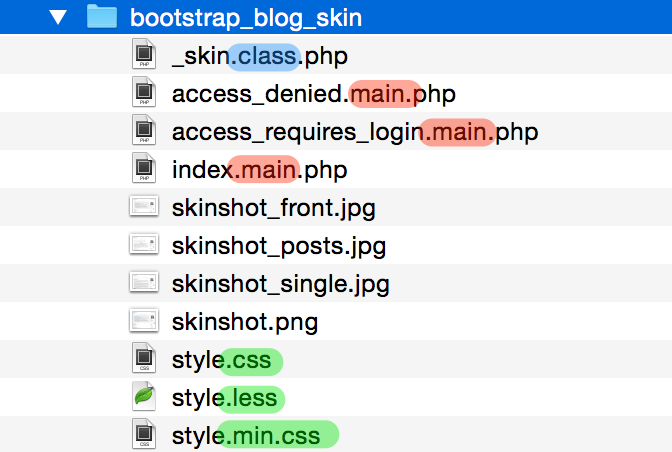
There are 4 kind of files heres:
index.main.php. This is a key file to know.When b2evolution wants to display $disp = front, it will look for a file named front.main.php. When b2evo wants to display $disp = posts, it will look for posts.main.php. And so on for any $disp value.
However, in the case of this skin, the templates above don’t exist! Because of this, b2evolution will resort to calling index.main.php instead. This is the universal fallback. This file must exist for every skin. index.main.php will be used until you define more specific .main.php templates.
This .main.php template is basically what lays out a Header container, a Sidebar container, a Footer container… and a main area.
In the main area, it will then hand-off display to a xyz.disp.php template. Here again, the name will match $disp. When b2evolution wants to display $disp = front, it will now try to include a file named _front.disp.php. When b2evo wants to display $disp = posts, it will now try to include a file named _posts.disp.php.
Here again, you will notice that these files are not defined for this skin. Furthermore, there is no such thing as _index.disp.php! Actually, in this case, b2evolution will resort to using a fallback template. We’ll tell you more about fallback templates in the next section.
For now, let’s have a quick look at the other templates we have in the "Boostrap Blog Skin" directory:
access_denied.main.php : this will be called for $disp = access_denied (in case of private blogs). We want to use this instead of index.main.php because the index.main.php happens to define a Sidebar container which we don’t want to show in case of denied access!access_requires_login.main.php : You can probably guess this one (very similar case).style.css.style.min.css. If you don’t want to use minification in your skin, you can disable it (see below).style.less.Remember the missing _front.disp.php and _posts.disp.php file we mentioned above?
When b2evolution doesn’t find a template it needs in the directory of the skin, it will look for it in the fallbacks folders named /skins_fallback_v5/, /skins_fallback_v6/, etc.
Let’s look at /skins_fallback_v5/:
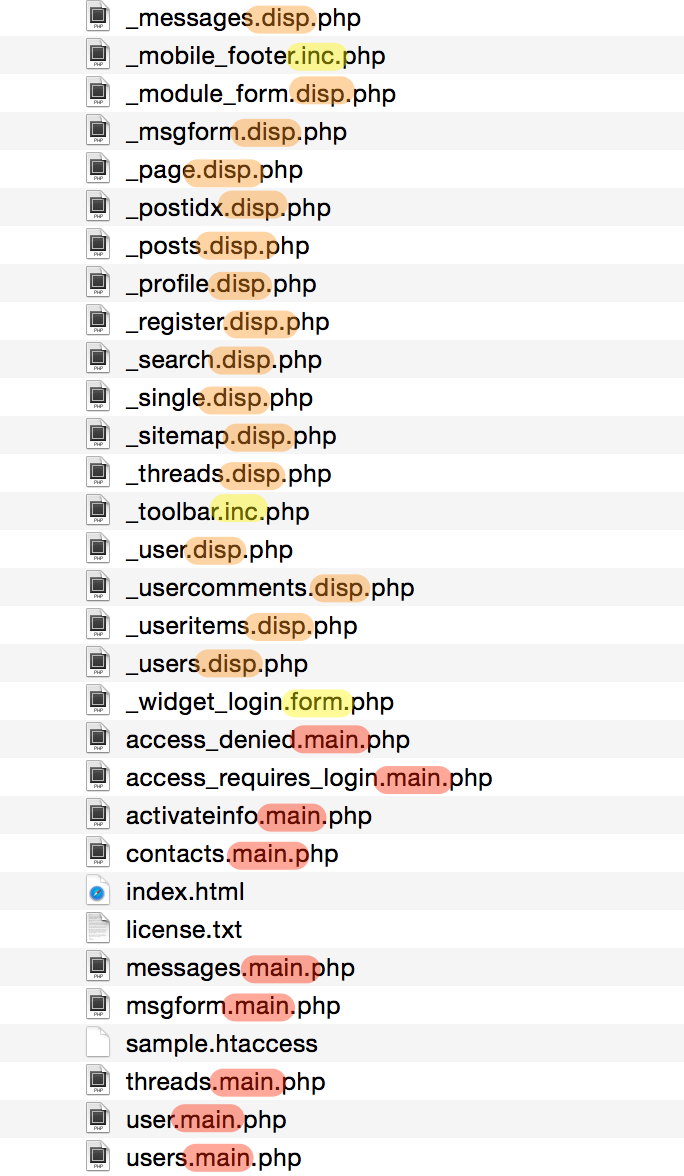
Can you see it has _posts.disp.php for example?
These fallback templates will be used when your skin doesn’t define its own variant of one of these templates. This means that your skin doesn’t need to implement every single feature and especially every new feature of the latest b2evolution version. There will almost always be a fallback mechanism to include a default template when your skin doesn’t have it. In many cases the fallback template will integrate well with your design. In other cases, of course, the visual aspect may not be optimal.
Notice there are basically 3 kinds of templates:
Now, how do we know for sure which template is used when?
Quite simple actually… do you remember the "Show includes" feature we introduced earlier:
If you look closely you will see that each green (or purple) box shows you the exact template being included. In this case, for example, you can see that when b2evolution is trying to include _font.disp.php it falls back to the version it finds in /skins_fallback_v6/ .
So what about this /skins_fallback_v5/ vs /skins_fallback_v6/thing?
Each skin can define which skin API version it’s using. If it doesn’t define anything it will use version 5. If you want version 6, you need to define it in _skin.class.php.
Then:
/skins_fallback_v5/./skins_fallback_v6/. And only if this fails will it fall back to /skins_fallback_v5/.Note there are no versions 1, 2, 3 and 4. They are all equal to 5. Before b2evolution version 6, there was no multi-step fallback mechanism. All skins had to share the same fallbacks.
We very much recommend that you always start with an existing skin that somehow approaches what you’re trying to do and progressively modify it. In our experience it’s the most productive way to reach your goal, with the added benefit of always having a working work-in-progress instead of keeping all the integration problems for the end.
If you would build a static HTML version of your skin first, you would quickly find that once you integrate real widgets into the containers you would need to rework all your margins and paddings. You would also find that you made some design decisions that are not desirable in the context of containers and widgets.
A least for your first time, we recommend you start with a stock skin that ships with b2evolution (so you’re sure that your reference point actually goes "by the book" and is not a variation of a variation of a variation with lots of obsolete code in it). Furthermore, we actually recommend you start with bootstrap_blog_skin which is the most stable reference point.
For the purpose of this primer, let’s start by duplicating the bootstrap_blog_skin skin folder. Let’s call our new skin custom_skin.
Note: if you know a little bit about GitHub, there is an even better option: start by cloning (or forking if you wish) the starter skin: https://github.com/b2evolution/starter_skin . This is the same as the bootstrap_blog_skin but it has some additional support files that will come in handy later.
So no matter what option you chose, you should now have a directory called /skins/custom_skin/.
Once you’ve renamed the folder, you also need to edit the _skin.class.php file that it contains. Open it in your favorite editor and make the following changes:
class bootstrap_blog_Skin (or class starter_Skin) to class custom_Skin. Note that your skin folder ends in _skin whereas the class name ends in _skin with an uppercase S. This is a very important distinction. Please make sure you follow this.return 'Bootstrap Blog'; to return 'My Custom Skin'; @subpackage comment at the top.The resulting file should look something like this:
<?php
/**
 * This file implements a class derived of the generic Skin class in order to provide custom code for
 * the skin in this folder.
 *
 * This file is part of the b2evolution project - {@link http://b2evolution.net/}
 *
 * @package skins
 * @subpackage custom
 */
if( !defined('EVO_MAIN_INIT') ) die( 'Please, do not access this page directly.' );

/**
 * Specific code for this skin.
 *
 * ATTENTION: if you make a new skin you have to change the class name below accordingly
 */
class custom_Skin extends Skin
{
	/**
	 * Get default name for the skin.
	 * Note: the admin can customize it.
	 */
	function get_default_name()
	{
		return 'My Custom Skin';
	}


	/**
	 * Get default type for the skin.
	 */
	function get_default_type()
	{
		return 'normal';
	}
(Only the beginning of the file is quoted above.)
Use the evobar Menu "Collection > Skin…" to see the param screen of the currently installed skin:
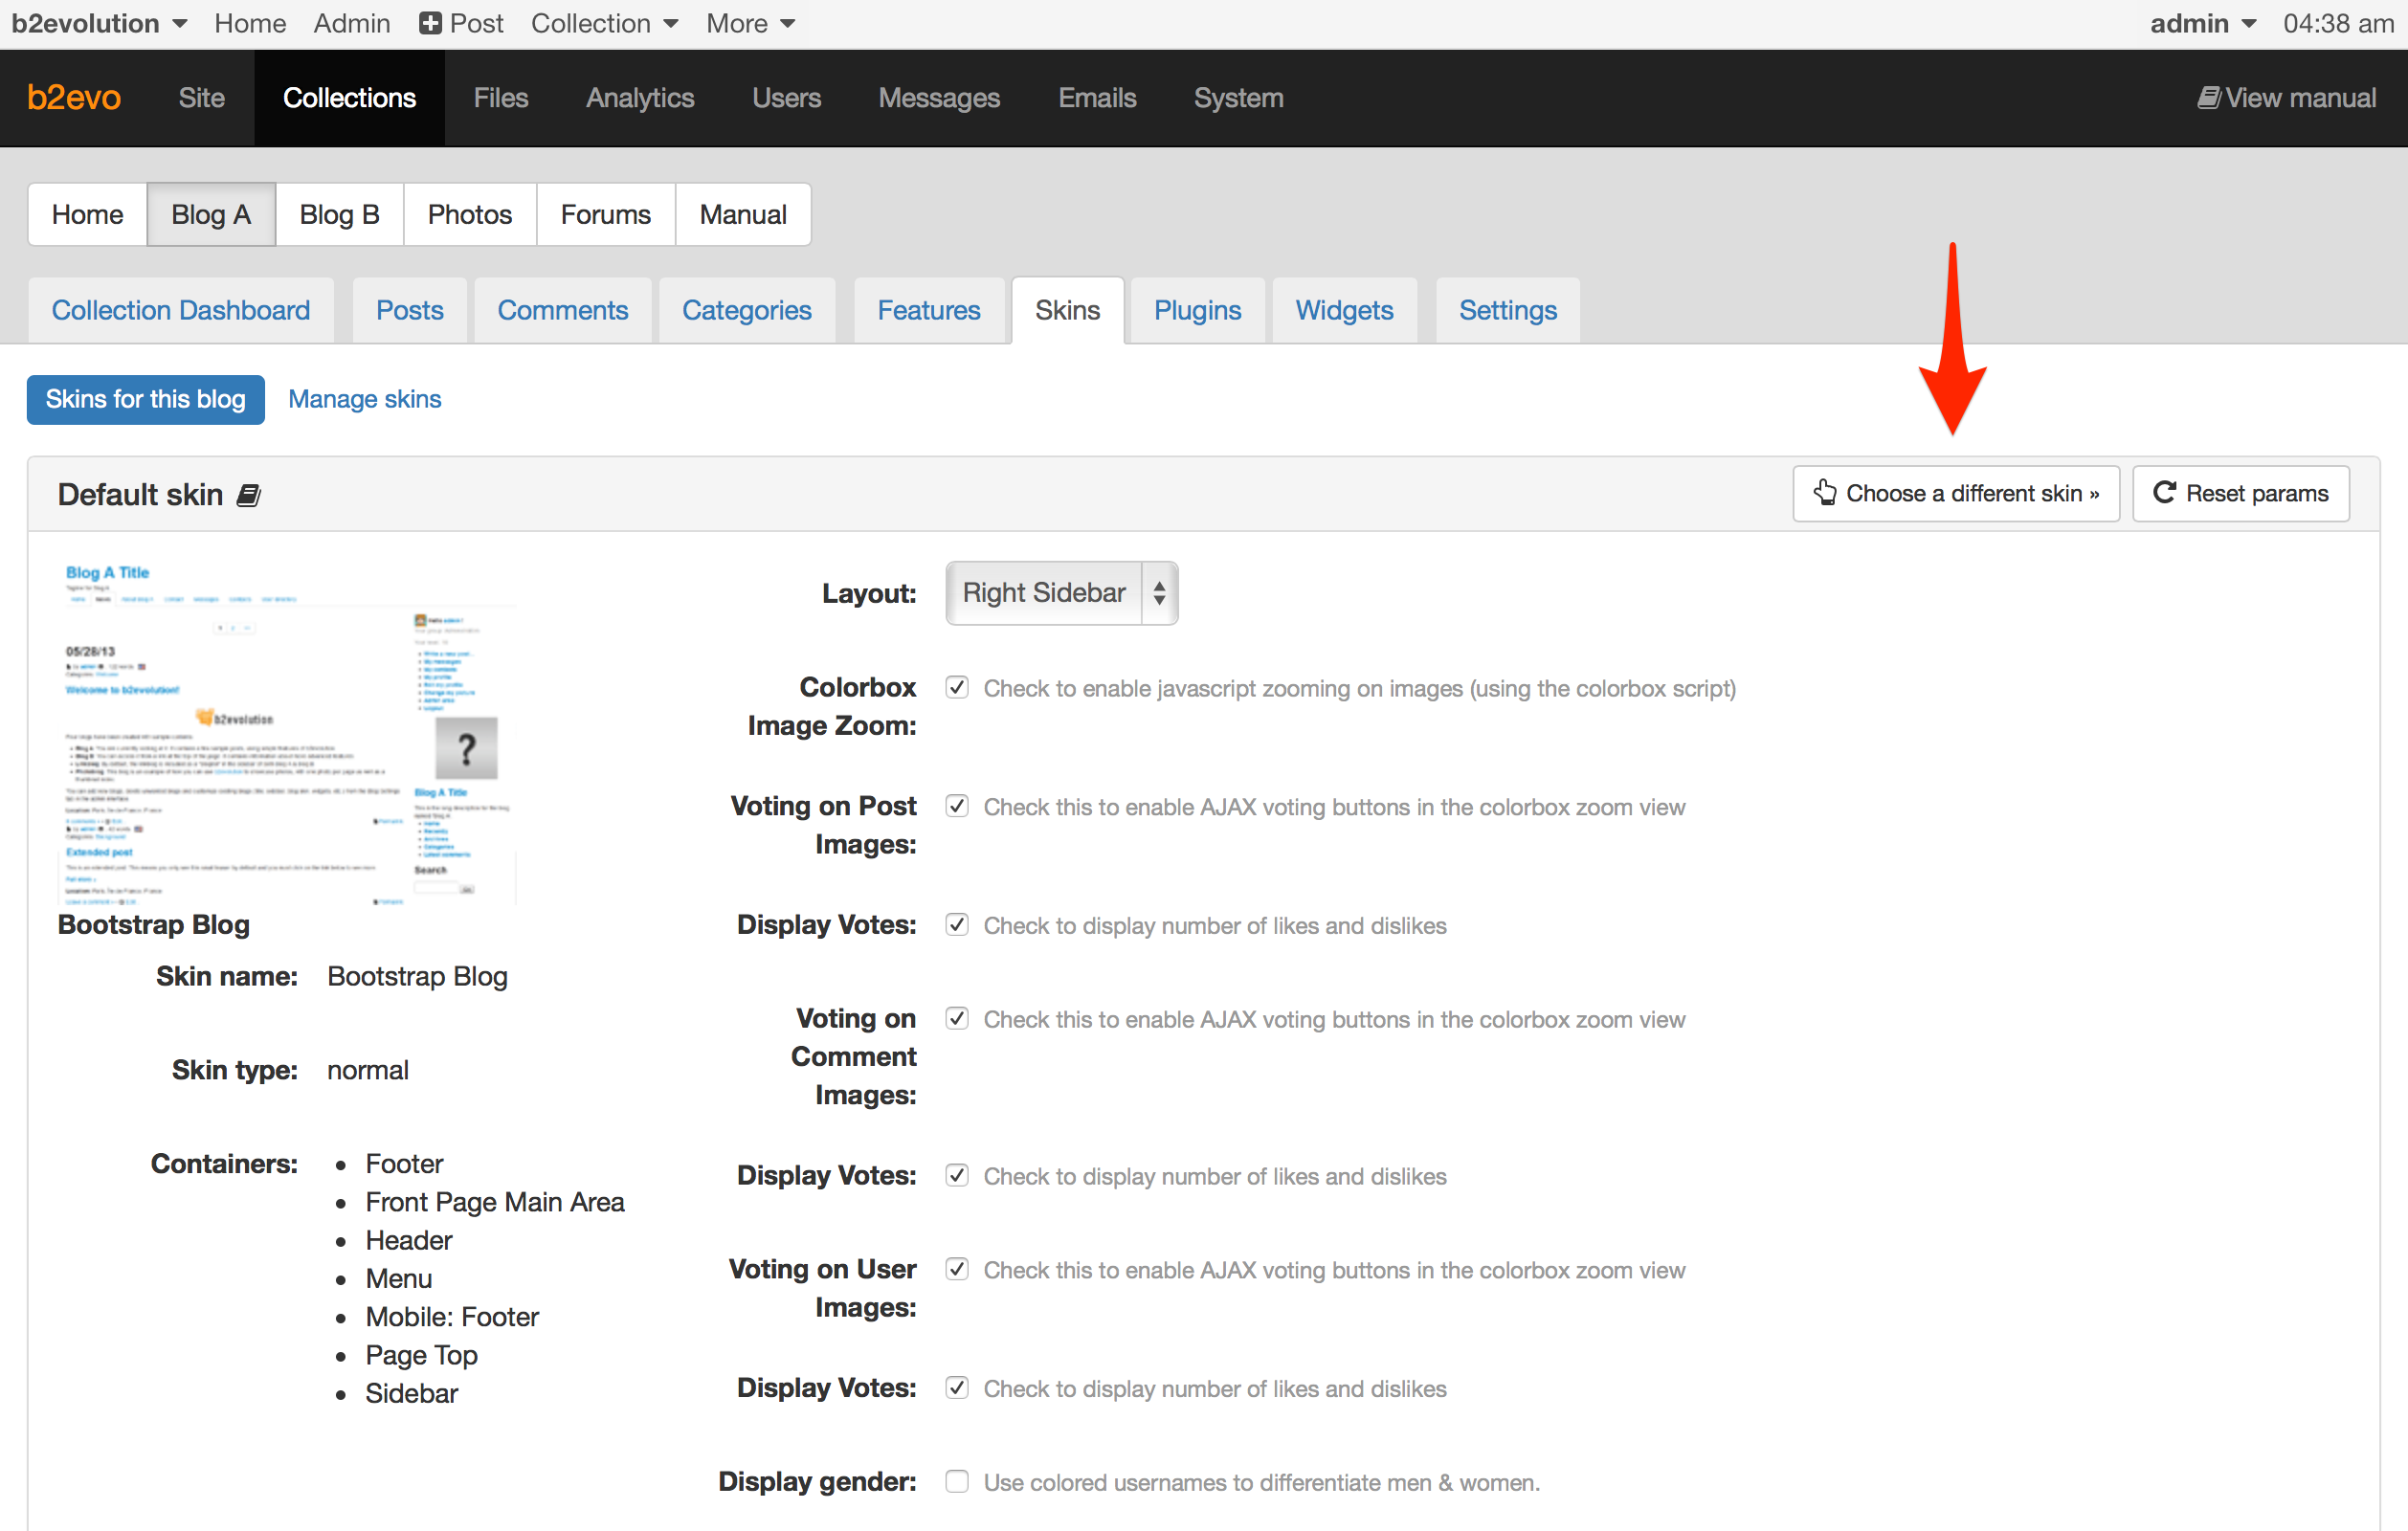
Click "Choose a different skin":

Here you could select one of the other installed skins. However, since your new skin hasn’t been installed yet, it doesn’t appear here.
In order to install your new skin, click "Install new skin". (You only need to do this once.)
The following screen shows you all the skin folders that have not yet been installed:
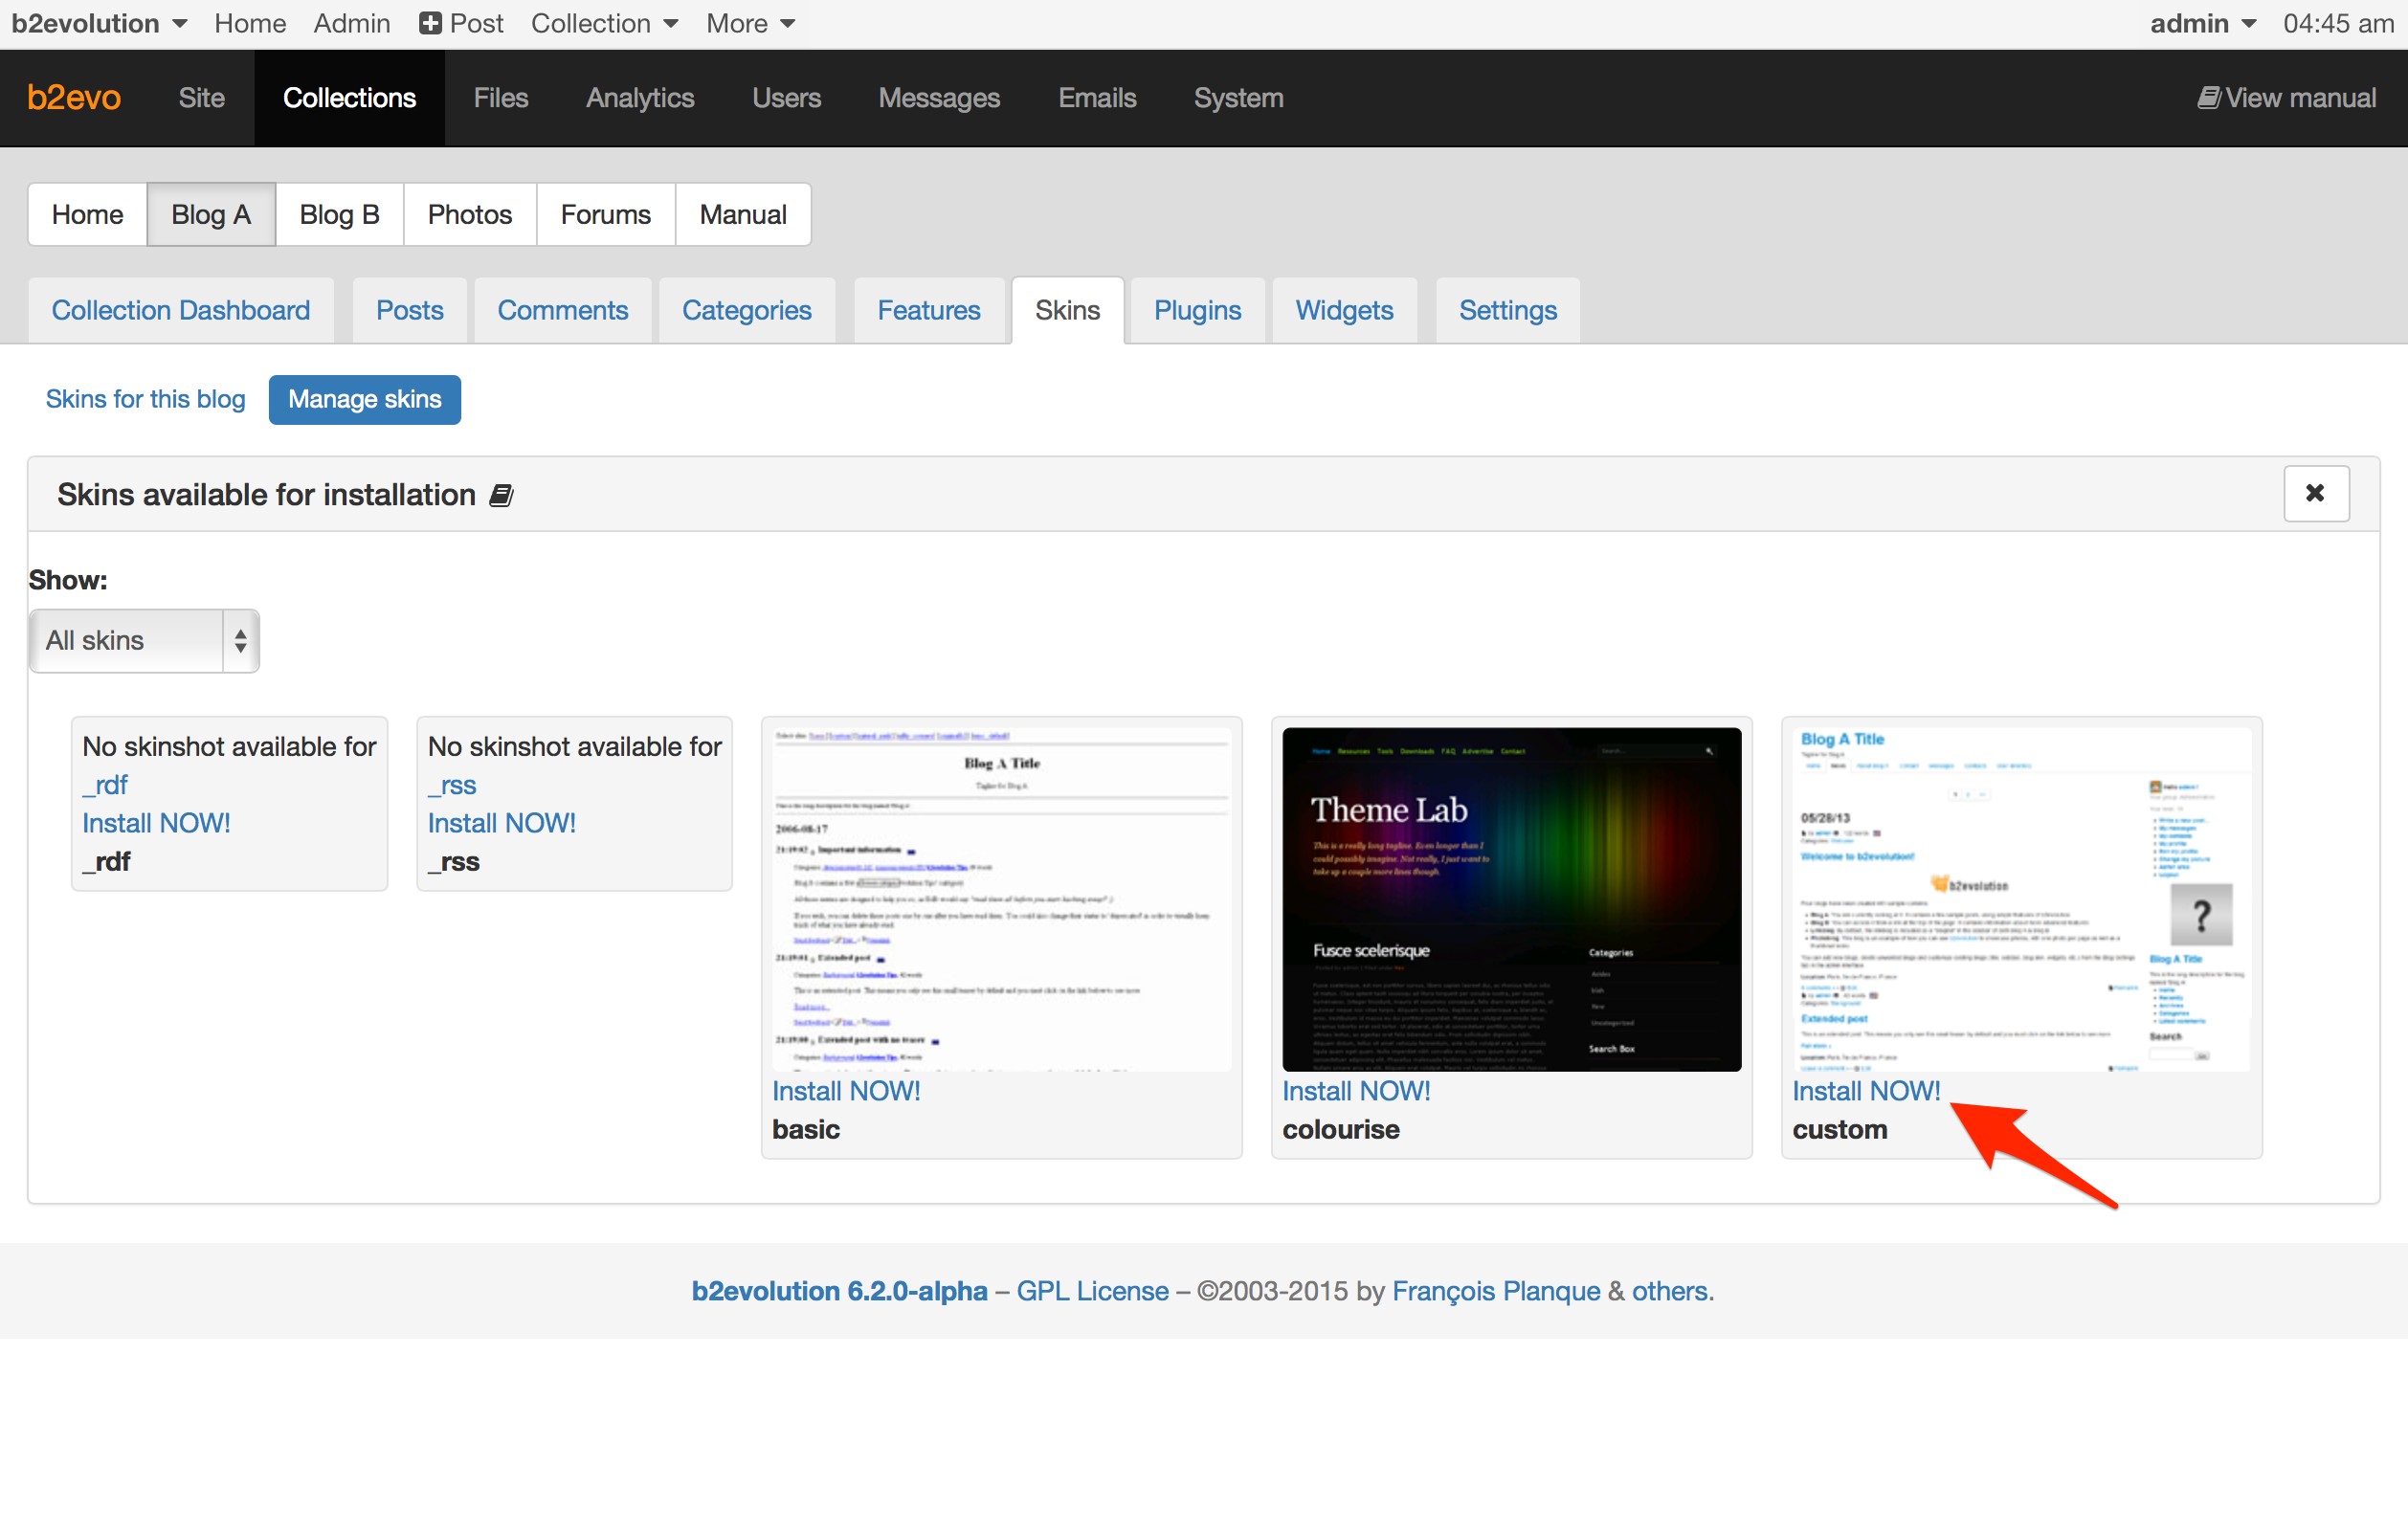
Choose the "custom" skin/folder and click "Install NOW!".
Once the skin is installed, you will be taken back to the screen where you can pick from all installed skins:
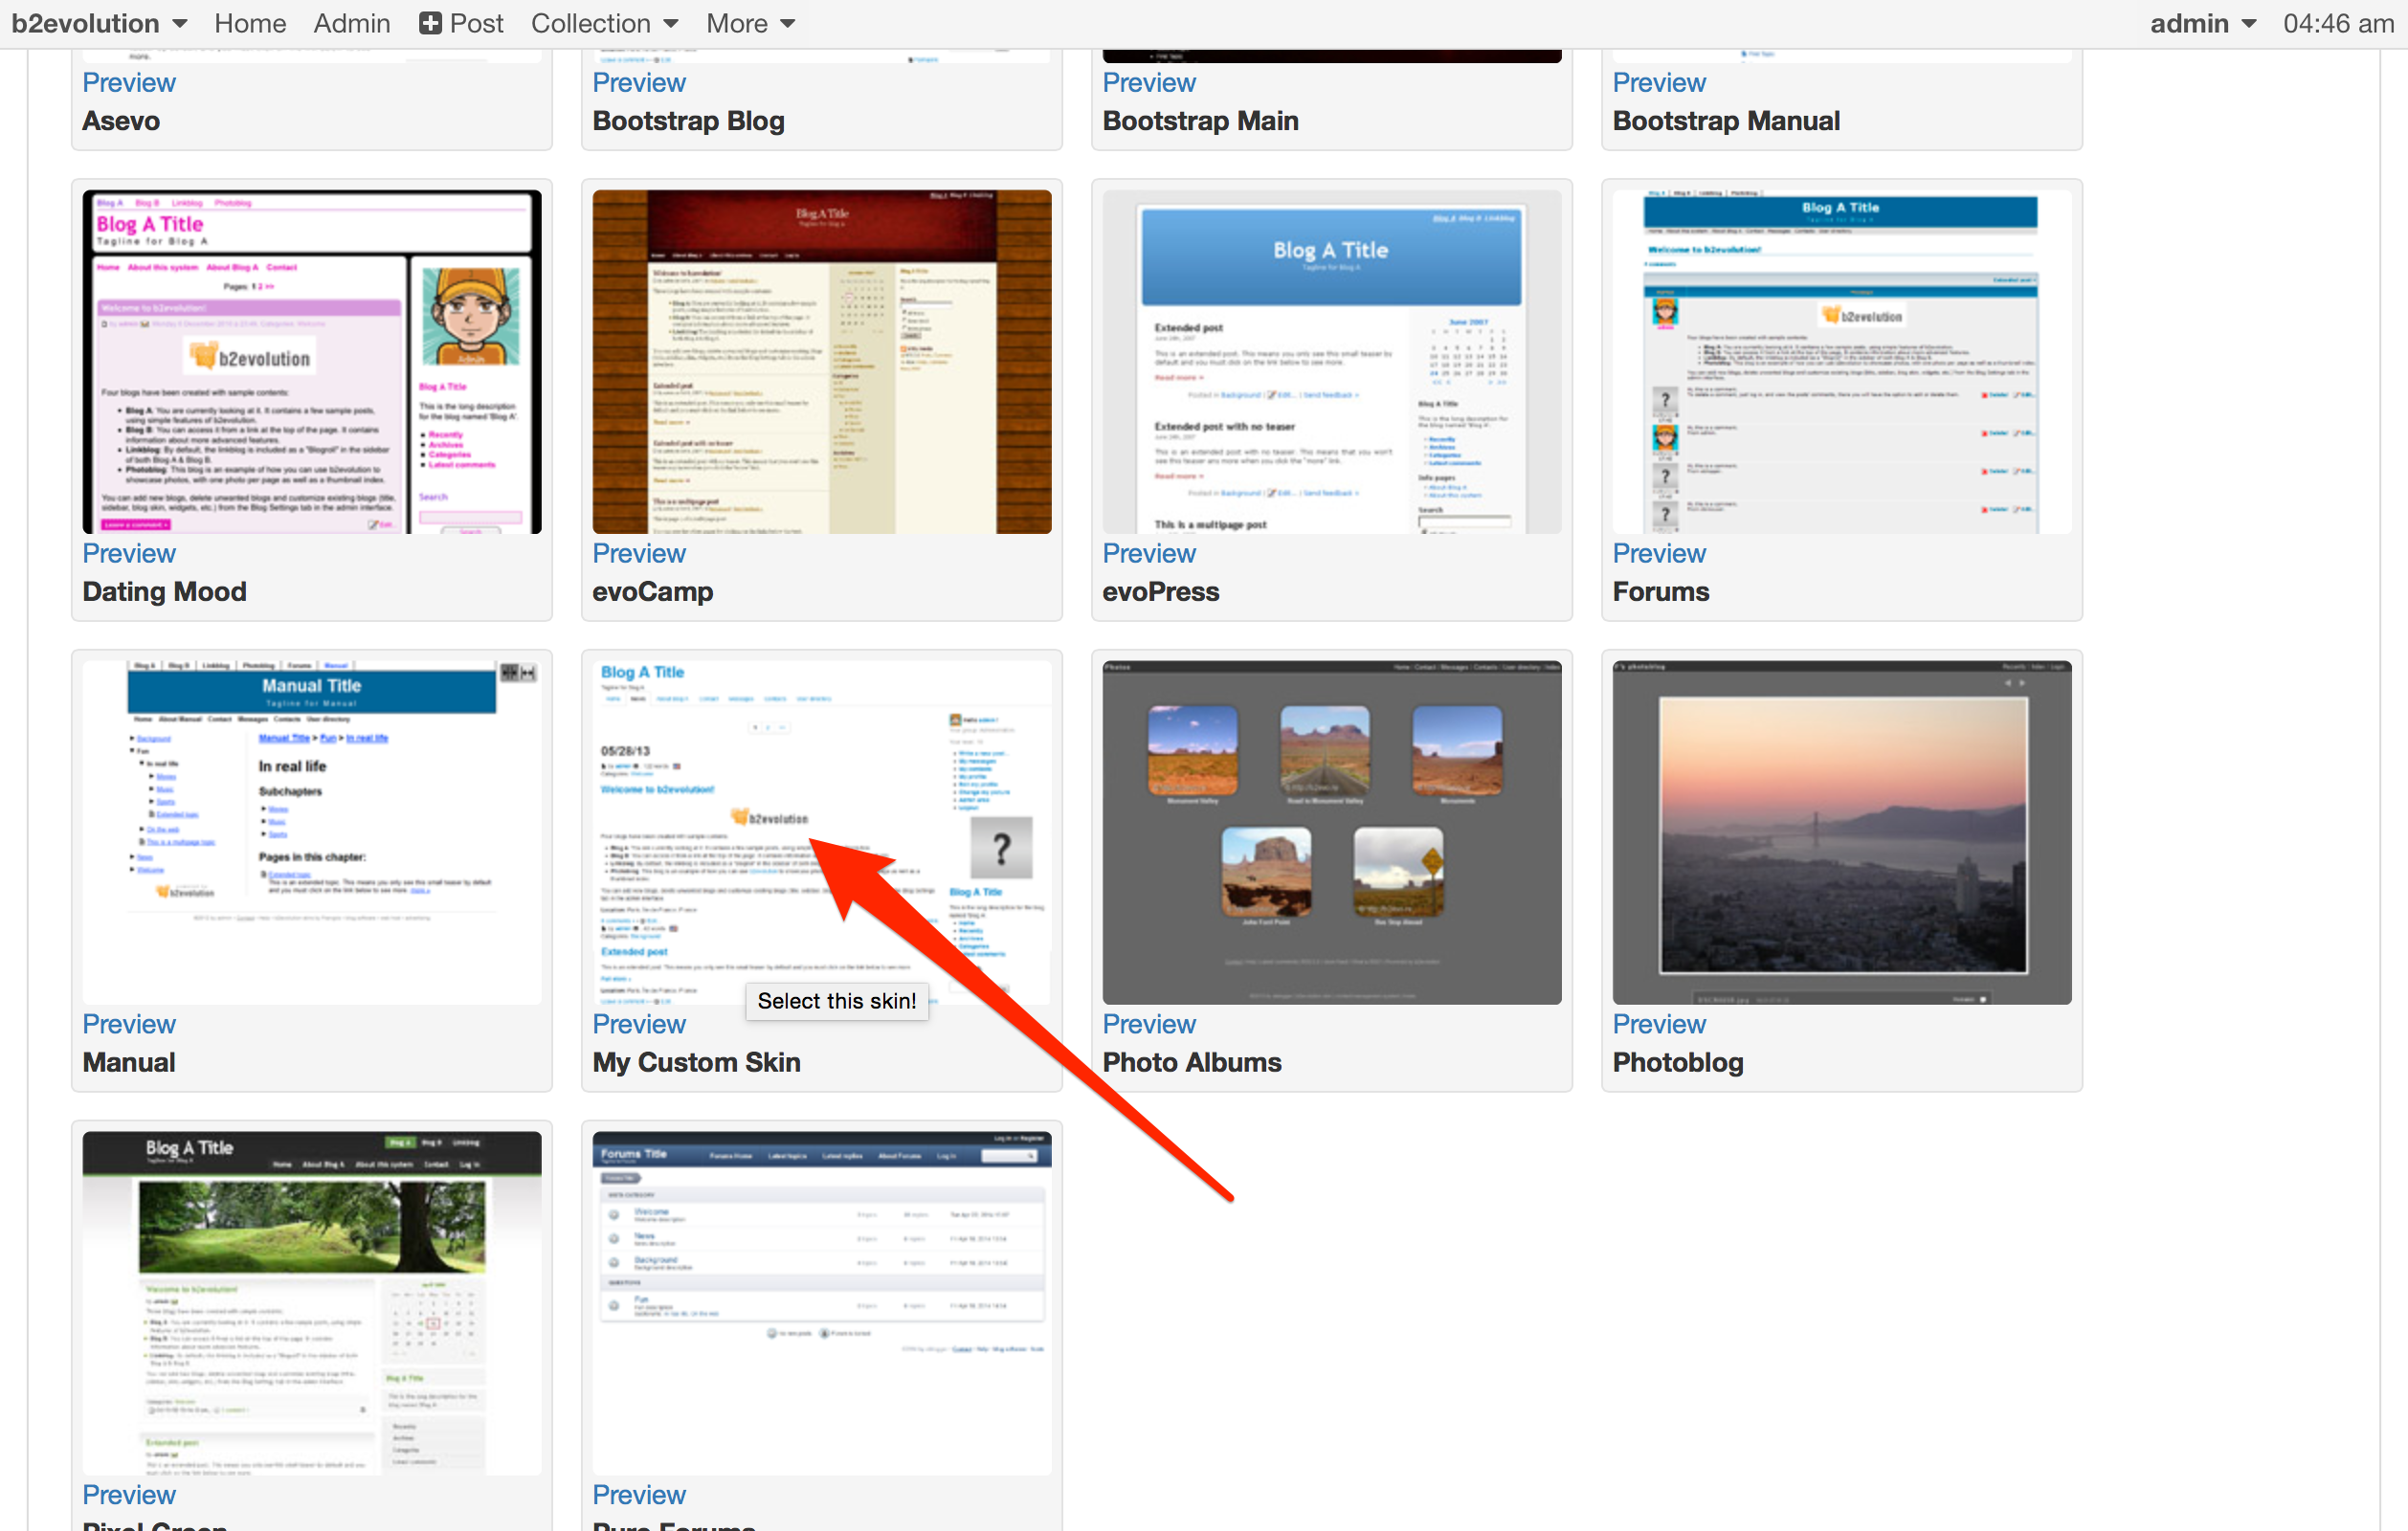
Select "My Custom Skin" by clicking on its thumbnail. (This thumbnail comes straight from skinshot.png btw).
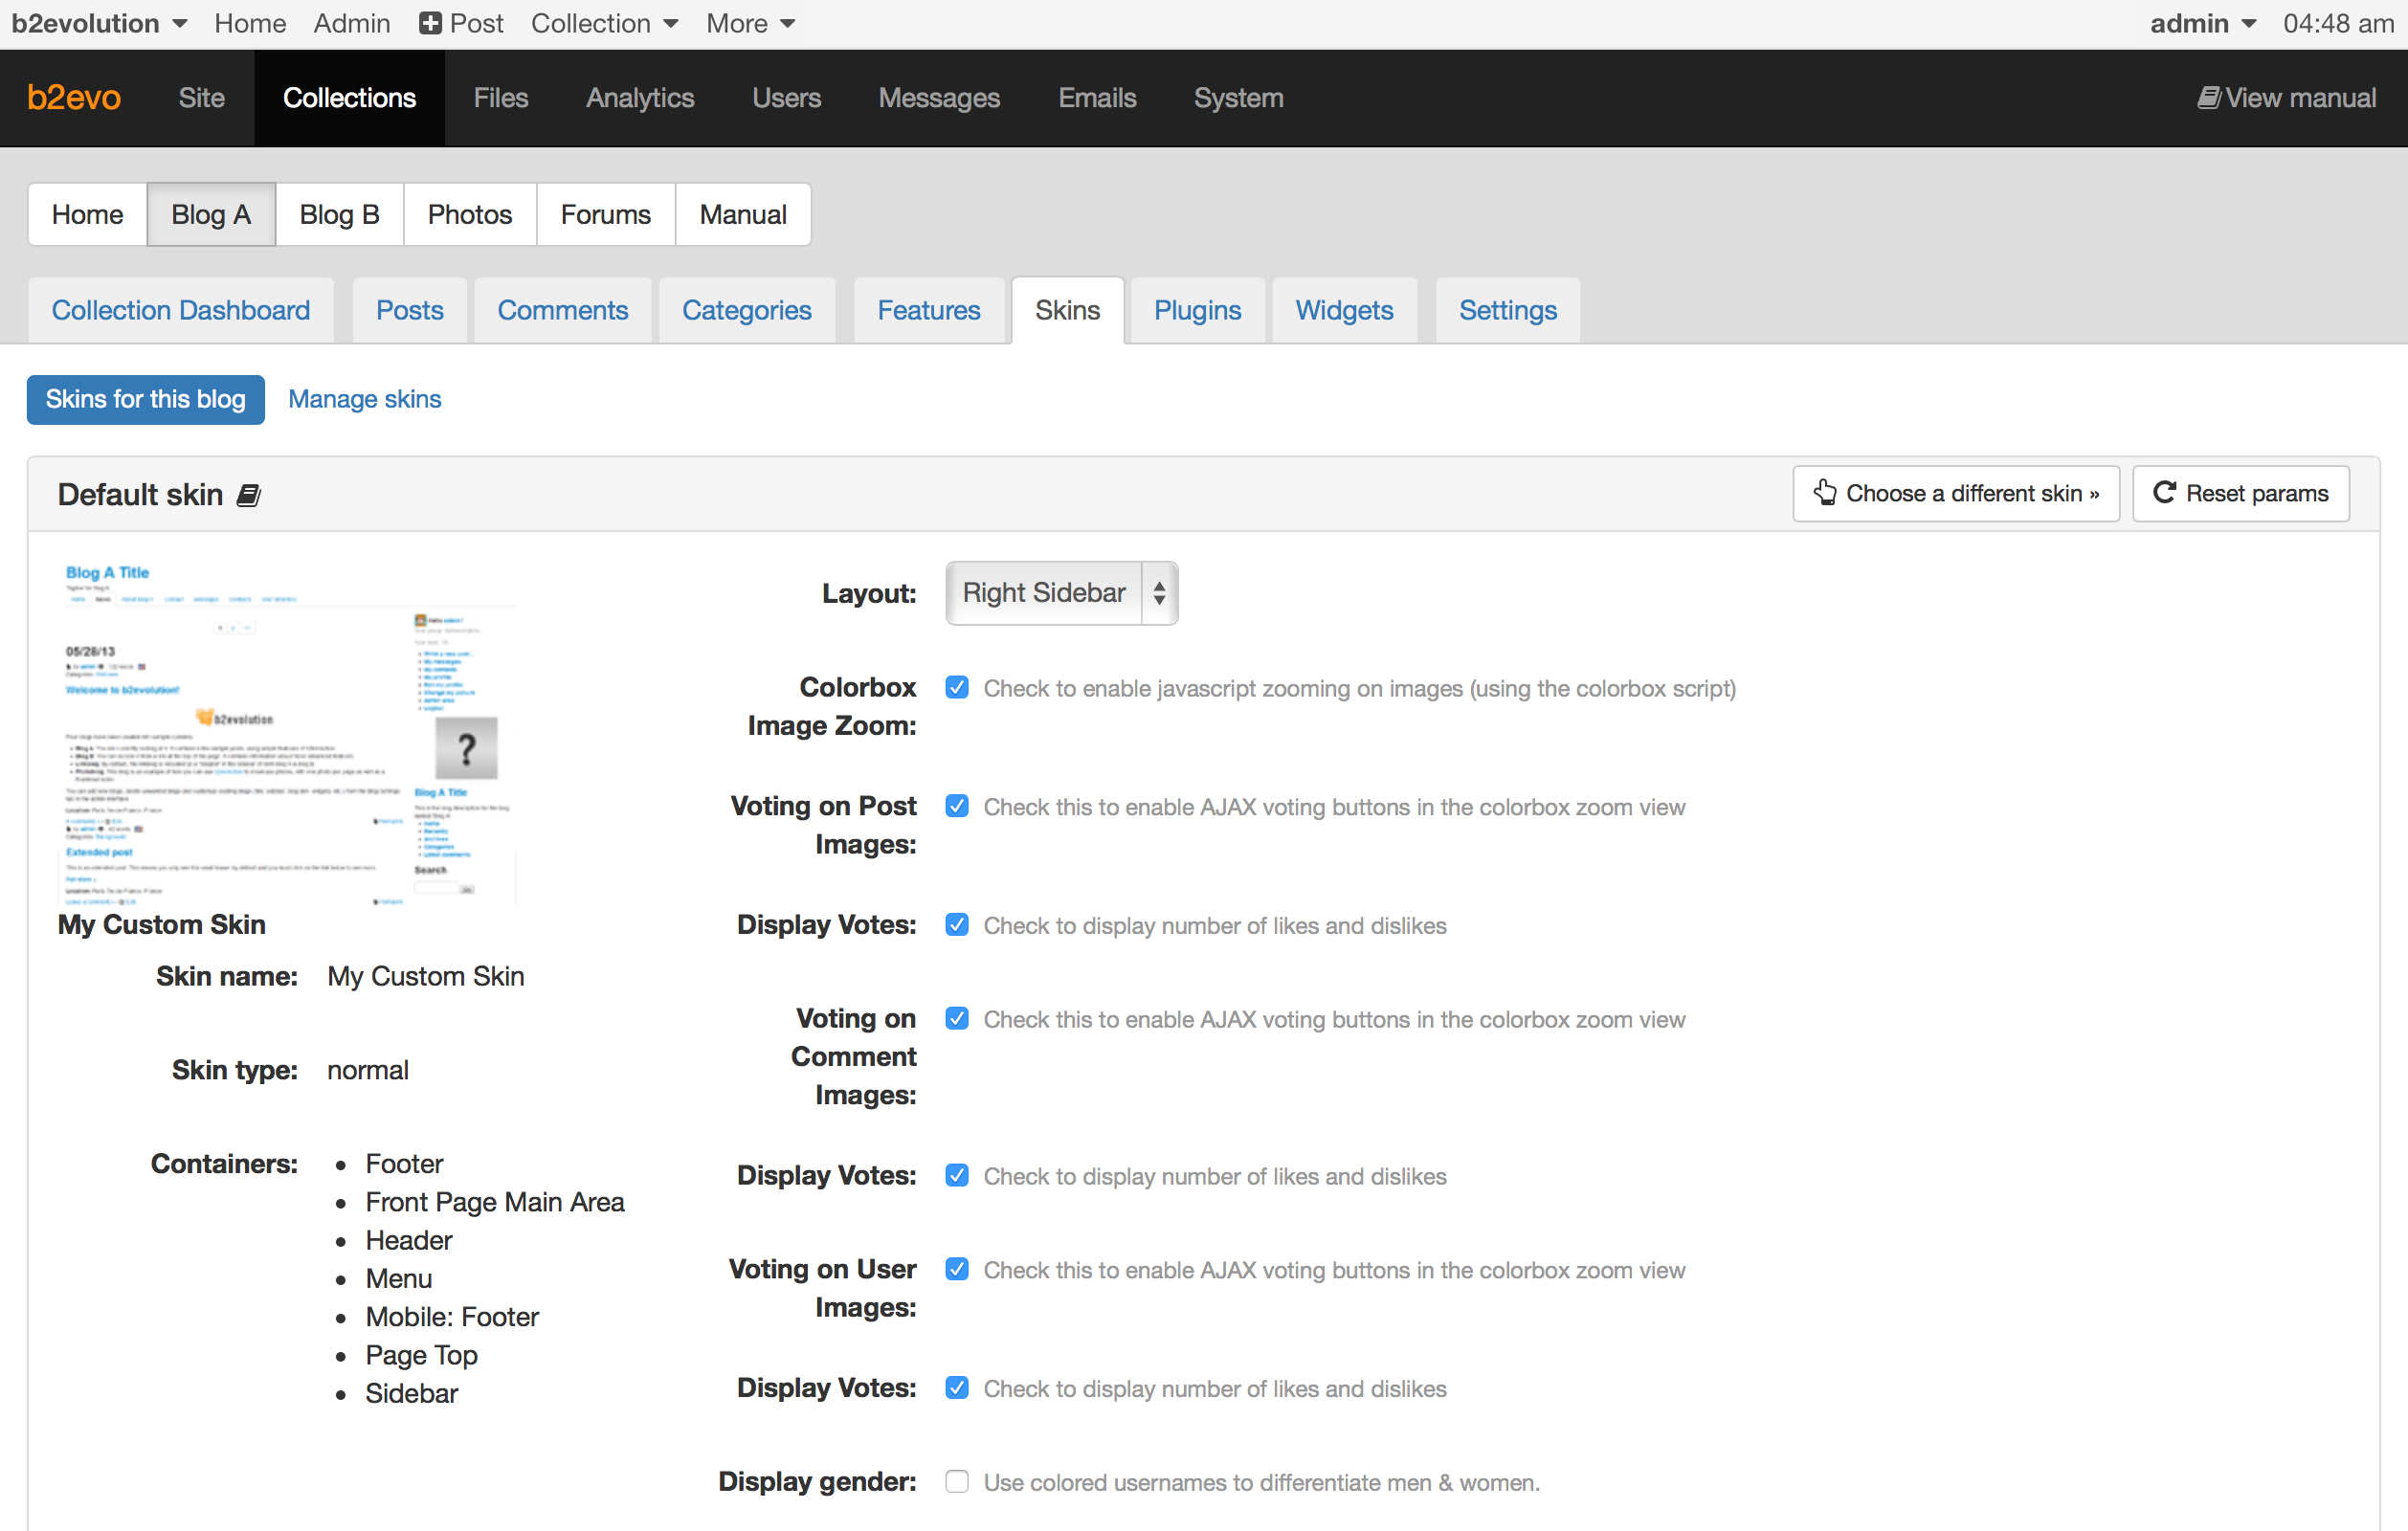
You’re now back on the current skin’s param screen, except you are now using the new "My Custom Skin":
To get your feet wet, you could start by changing a little bit of CSS.
Like most modern web designs, b2evolution Skins use compiled CSS. This means that there are several different files involved:
style.less or style.scss, which is LESS or SASS code and which has been compiled (processed) into:style.css, which is normal CSS code, which in turn has been compressed (minified) into:style.min.css, which is the optimal, best performance CSS file your website can load.The skins that come with b2evolution use Grunt for compiling. Other skins, may have used other tools.
Using LESS or SASS and Grunt is outside the scope of this primer but we’ll give you a quick example of how you can customize the CSS file of the skin.
So let’s start by getting the LESS/SASS and minified files out of the way, before they interfere with your CSS edits: Delete style.less (or style.scss if it exists) as well as style.min.css from your skin’s folder.
Now, check that the skin still works. It should automatically resort to loading style.css instead of style.min.css. Should this not be case, please check the following line in your skin’s _skin.class.php:
	/**
	 * Do we want to use style.min.css instead of style.css ?
	 */
	var $use_min_css = 'check';  // true|false|'check' Set this to true for better optimization
	// Note: we leave this on "check" in the bootstrap_blog_skin so it's easier for beginners to just delete the .min.css file
	// But for best performance, you should set it to true.
../..
Note that you may actually be able to do a lot more CSS-only customizations than you might think. This is made possible because the <body> tag is supercharged with contextual classes that will allow you to use very context specific CSS selectors in a number of situations. Learn more here: Targeted CSS Selectors.
index.main.php templateWe recommend you take a walk through your /skins/custom/index.main.php by opening it in your text/PHP editor.
See how it lays out some structural <div>s and fills them with Containers. Also note how it’s including sub-templates.
Note how an array of parameters is passed to each container as well as to each included sub-template. By modifying these parameters you can radically influence the HTML code that will be generated by Widgets as well as by Fallback Templates without needing to edit them.
This is the main reason why most skins have so few templates and why fallback templates are called so much – because it’s easy to pass parameters to customize the output of the fallback templates.
../..
Here we will show you how to add a single.main.php controller in order to have a completely different layout for a single post view (disp=single) than for the home page and everything else (all other disps).
In this example we will keep the original layout with a sidebar for most pages but for disp=single, we’ll make a template that has no sidebar in order to remove distractions at the time of reading.
Start by duplicating the file index.main.php and name the new one single.main.php. This new file will now automatically be called for all disp=single pages.
Let’s start customizing this new template…
You can remove the Sidebar container (from the single.main.php template in this case) by removing the following PHP code:
	<?php
		// ------------------------- "Sidebar" CONTAINER EMBEDDED HERE --------------------------
		// Display container contents:
		skin_container( NT_('Sidebar'), array(
				// The following (optional) params will be used as defaults for widgets included in this container:
				// This will enclose each widget in a block:
				'block_start' => '<div class="panel panel-default widget $wi_class$">',
				'block_end' => '</div>',
				// This will enclose the title of each widget:
				'block_title_start' => '<div class="panel-heading"><h4 class="panel-title">',
				'block_title_end' => '</h4></div>',
				// This will enclose the body of each widget:
				'block_body_start' => '<div class="panel-body">',
				'block_body_end' => '</div>',
				// If a widget displays a list, this will enclose that list:
				'list_start' => '<ul>',
				'list_end' => '</ul>',
				// This will enclose each item in a list:
				'item_start' => '<li>',
				'item_end' => '</li>',
				// This will enclose sub-lists in a list:
				'group_start' => '<ul>',
				'group_end' => '</ul>',
				// This will enclose (foot)notes:
				'notes_start' => '<div class="notes">',
				'notes_end' => '</div>',
				// Widget 'Search form':
				'search_class'         => 'compact_search_form',
				'search_input_before'  => '<div class="input-group">',
				'search_input_after'   => '',
				'search_submit_before' => '<span class="input-group-btn">',
				'search_submit_after'  => '</span></div>',
			) );
		// ----------------------------- END OF "Sidebar" CONTAINER -----------------------------
	?>
Save the template and try it out.
Now you have an empty column on disp=single. You may also want to remove the div for that column:
<!-- =================================== START OF SIDEBAR =================================== -->
	<?php
	if( $Skin->get_setting( 'layout' ) != 'single_column' )
	{
	?>
		<div class="col-md-3"<?php echo ( $Skin->get_setting( 'layout' ) == 'left_sidebar' ? ' style="float:left;"' : '' ); ?>>

		</div>
	<?php } ?>
	</div>
In order to get rid of the "empty column", let’s deal with the main column. The code that currently sets its div is like this:
<!-- =================================== START OF MAIN AREA =================================== -->
	<div class="row">
		<div class="<?php echo ( $Skin->get_setting( 'layout' ) == 'single_column' ? 'col-md-12' : 'col-md-9' ); ?>"<?php
				echo ( $Skin->get_setting( 'layout' ) == 'left_sidebar' ? ' style="float:right;"' : '' ); ?>>
Since we don’t have a sidebar any more, we don’t need to deal with the multiple settings possible in the skin params any more either. So we don’t need the PHP code that determines the width and position. Let’s go for a full width main area:
<!-- =================================== START OF MAIN AREA =================================== -->
	<div class="row">
		<div class="col-sm-12">
But when you look at it, it’s not very classy… is it?
So let’s make the main area narrower and with margins on the sides:
<!-- =================================== START OF MAIN AREA =================================== -->
	<div class="row">
		<div class="col-sm-8 col-sm-offset-2">
Looks better?
But we don’t want the margins on small screens. So let’s make this responsive:
<!-- =================================== START OF MAIN AREA =================================== -->
	<div class="row">
		<div class="col-sm-12 col-md-10 col-md-offset-1 col-lg-8 col-lg-offset-2">
This of course if far from perfect. We’re just quickly demonstrating the concept here.
Remember you can override any fallback template just by duplicating the file into the folder of your skin. This new version will then the called instead of the fallback.
../..
We’d love to answer your questions so they can benefit everyone else!
Please post any question you have at this point into the comment form below.
We’ll update this primer as needed.

The section entitled "Understanding the Skin API version" contains useful information, but it doesn’t say anything about the differences between API 5 and API 6. I imagine, at some point, I’d like to know about that.
The section entitled "Edit the skin.class file" has two grey highlights. The second highlight should say _Skin not _skin.
BTW, I haven’t used b2evo for a few years, and this page is fantastic! Extremely helpful and very clear! Thank you.
I can’t open the development section it is grayed out; what should I do?